CFEngine 3 Enterprise 2.2 Owner's Manual
Updated 9. August 2012
CFEngine 3 Enterprise 2.2 Owner's Manual
COMPLETE TABLE OF CONTENTS
Summary of contents
1 Introduction
1.1 CFEngine 3 Enterprise - the new CFEngine 3 Nova!
CFEngine 3 Enterprise 2.2 is the next generation of CFEngine 3 Nova (successor of CFEngine 3 Nova 2.1.3), upgraded with productivity and performance enhancements. We have made a new Mission Portal Status and Reports room tailored to the needs of infrastructure engineers, making it both easier and more powerful to use. Most notably we have introduced dynamic grouping of hosts through a flexible tree control, also referred to as the Navigation Tree. It allows system adminsitrators to flexibly group hosts based on CFEngine classes, both discovered (hard classes such as operating system, architecture, IP address, etc.) and user defined (soft classes such as webserver, development, staging, etc).
CFEngine 3 Nova is compatible with CFEngine 3 Enterprise and can easily be upgraded by following the instructions in this document.
The launch of CFEngine 3 Enterprise also brings a new offering: CFEngine 3 Free Enterprise, our commercial enterprise product offered for free for up to 25 managed hosts. It differs from our commercial offer in that it has different licensing terms, different support and it is limited to a maximum of 25 hosts. The product is described in full detail at http://cfengine.com/25free. Please note that CFEngine 3 Enterprise should not be installed as an upgrade to CFEngine Community. I that case uninstall CEngine Community, do a clean install of CFEngine 3 Enterprise and then move your existing policies to the new Enterprise hub. See the Enterprise FAQ for more information.
1.2 About CFEngine 3 Enterprise
CFEngine 3 Enterprise is a commercially licensed version of the core CFEngine
software1 with enterprise library extensions. All of
the documentation for CFEngine 3 applies to CFEngine 3 Enterprise.
The aim of CFEngine 3 Enterprise is to offer a knowledge-enhanced framework for configuration man-
agement that goes beyond mere technical configuration to support the needs of businesses. Features
include compliance management, reporting and business integration, and tools for handling necessary
complexity. CFEngine 3 Enterprise has features to support Cloud Computing for public and private clouds, as
well as greater integration facilities with database resources.
2 Requirements
2.1 Hardware requirements
The default CFEngine 3 Enterprise architecture uses a single hub, or policy server, to publish changes of policy
and to aggregate knowledge about the environment, but you can set up as many as you like to manage
different parts of your organization independently. The CFEngine technology is not centralized by
nature. Most users choose to centralize updating of policy and report aggregation for convenience
however.
The default architecture and configuration skeleton of CFEngine 3 Enterprise is expected to scale to a few thousand hosts with a
dedicated policy hub. In such a case, your hub machine should have at least 2 GB of memory and a modern processor.
For machines under CFEngine's management (clients), a full installation of CFEngine 3 Enterprise requires about 20 MB of disk storage. Otherwise disk usage depends on your specific policies, especially those that concern reporting. Each software component (agent) typically uses under 10 MB of memory, but spikes in memory usage can occur if several agents run simultaneously. CFEngine recommends to have 256 MB available memory on the clients.
2.2 Operating system support
CFEngine can be made to run on most operating systems. For efficiency
CFEngine only supports packages for a number of recent popular operating systems,
which should be up to date with patches. If we don't have packages for
your particular operating systems we can usually make packages by
special arrangement please contact your sales representative.
CFEngine 3 Free Enterprise is only available for Linux Operating Systems (both hub and client). Commercial CFEngine 3 Enterprise customers have access to all the following Operating Systems.
The hub (policy server) is only available for derivatives of the
top GNU/Linux distributions (Debian, Red Hat, SuSE, Ubuntu), as these make available
software that the hub relies on for data storage and processing.
Operating system choices for the hub are:
      Debian 6
      Ubuntu 8.04, 10.04, 12.04
      RHEL/CentOS 5, 6
Operating system choices for the clients are:
     AIX 5.3, 6.1, CentOS 5, 6, Debian 5, 6, Fedora 14, 15, 16, FreeBSD 7, 8,
     HP-UX, NetBSD 4.0, 5.0, 5.1, openSUSE 10.2, 10.3, 11.1, 11.2, 11.3,
     11.4, RHEL 4, 5, 6, SLES 9, 10, 11, SUSE Linux 9.1, 9.2, 9.3, 10.0, 10.1,
     Solaris 8, 9, 10, Ubuntu 8.04, 8.10, 9.04, 9.10, 10.04, 10.10,
     11.04, 11.10, 12.04, Windows XP, Vista, 7, Server 2003, Server 2008
See Release Notes CFEngine 3 Enterprise.txt for details on supported architectures.
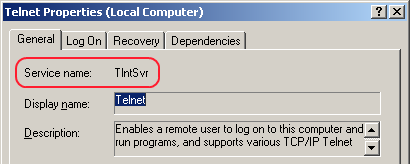
CFEngine 3 Enterprise provides a version of CFEngine running natively on Windows, with support for registry management, Windows services and file security, See Windows-specific features in CFEngine 3 Enterprise. Support for Solaris zones has been added through automated zone detection and process model adaptation.
A working package manager is required on the hub/policy server to install an Apache Web Server, php module, MongoDB, subversion, etc. You should start from a blank system (i.e. with none of these components installed) to avoid potential interference with the installation process. No special software is otherwise required on machines in your network, CFEngine bundles all critical dependencies in the CFEngine 3 Enterprise package.
3 Installing CFEngine 3 Enterprise
3.1 Installation procedure
CFEngine 3 Enterprise is designed to be simple to install in its default configuration. The installation
process has two phases (or three phases for commercial customers who need to obtain a license):
- Unpack the software
- For commercial customers (skip for CFEngine 3 Free Enterprise): Obtain a license
- Bootstrap the agents to a hub (the hub serves as a policy server and report collector)
The following procedure counts for a fresh install, please see Upgrading to CFEngine 3 Enterprise for how to upgrade from earlier versions of CFEngine.
You should start from a blank system (see also Hardware requirements). If you have been using CFEngine Community Edition and you have
already developed a policy, set aside this policy during the installation process. You will be able
to integrate it back later.
CFEngine 3 Enterprise is provided in two packages, cfengine-nova_<VERSION NUMBER> and cfengine-nova-expansion_<VERSION NUMBER>. The main software package
must be installed on every host (including the hub). The expansion package is only installed on the policy hub. You should install and set up the hub first.
References to package managers assume that additional packages might need to be installed on the hub (policy server). Root privilege is required for the installation.
- Verify that the machine's network connection is working and that port 5308 (used by CFEngine) and port 80 (used for the Mission Portal) is open for both incoming and outgoing connections. On the hub, verify that package managers
yum,
zypper or apt-get are working. They will be used to
install a web server, database, php server and subversion. If you are not able to set up a package manager and
repository on the hub, please see How do I install the prerequisites for the hub manually?
- Copy the CFEngine 3 Enterprise packages to the system. On the hub (policy server):
          cfengine-nova_2.2.xxx.[rpm|deb]
          cfengine-nova-expansion_2.2.xxx.[rpm|deb]
On all other machines:
cfengine-nova_2.2.xxx.[rpm|deb]
- Unpack the software:
- Red Hat family
-
host# rpm -ihv packages
- SUSE family
-
host# rpm -ihv packages
- Debian family
-
host# dpkg --install packages
- Skip this step for installation of CFEngine 3 Free Enterprise. On the hub, a public key has now been created in /var/cfengine/ppkeys/localhost.pub as part of the
package installation. Commercial customers should send this public key to CFEngine Support2 as an attachment in the ticket system,
to obtain a license file license.dat.
|
Save the returned license file to /var/cfengine/masterfiles/license.dat
on the hub before continuing.
|
- The remaining steps apply to all hosts, but you should install the hub (policy server) first. For large systems (> 1000 hosts) we recommend increasing the memory limit in php.ini on the hub (for instance to 128 MB).
Find the hostname or IP address of the hub (policy server), here we assume ‘123.456.789.123’ is the address.
hub # /var/cfengine/bin/cf-agent --bootstrap --policy-server 123.456.789.123
Use the same command on all hosts, i.e. *** do not bootstrap the policy server with a localhost address ***
If you mistype the address of the hub, we recommend doing the following steps to re-boostrap.
      hub # /var/cfengine/bin/cf-agent --bootstrap --policy-server 123.456.789.124
      hub # killall cf-execd cf-serverd cf-monitord cf-hub
      hub # rm -rf /var/cfengine/inputs/*
      hub # rm -f /var/cfengine/policy_server.dat
      hub # /var/cfengine/bin/cf-agent --bootstrap --policy-server 123.456.789.123
CFEngine will output diagnostic information upon bootstrap (written to command line and syslog; cf-agent will also return a value: ERROR: 1, SUCCESS: 0). Error messages will be displayed if bootstrapping failed, pursue these to get an indication of what went wrong and correct accordingly. If all is well you should see the following in the output:
-> Bootstrap to 123.456.789.123 completed successfully
- CFEngine should now be up and running on your system. The Mission Portal will not be immediately accessible, you should wait 10-15 minutes for the system to converge before attempting to connect to the hub IP-address through your web browser (the convergence process can take up to 30 minutes). CFEngine will copy its default policy files into masterfiles on the hub (policy server) provided that the directory is empty (fresh install). When the clients are bootstrapped, they will contact the hub and copy them to their inputs directory.
- Skip this step for installation of CFEngine 3 Free Enterprise. To complete licensing setup, you should make a promise to accept the license
terms by editing /var/cfengine/masterfiles/promises.cf and /var/cfengine/masterfiles/failsafe.cf
on the hub (policy server), changing the line ‘host_licenses_paid => "<NUMBER>";’
in ‘body common control’ to reflect the correct number of licenses that you have subscribed to.
How to assess success in this procedure:
- Look at the process list on the systems with ‘ps waux | grep cf-’.
You should be able to see
cf-execd running, and eventually other processes from
the CFEngine suite like cf-monitord cf-serverd. On the hub, you should
also eventually see cf-hub. Note that it may take 5–10 minutes before all the
processes get started.
- Look for files in /var/cfengine/inputs (Unix)
or C:\Program Files\Cfengine\inputs (Windows). The license
file will be copied out from the policy server to the clients as part
of the normal distribution of policy. Each machine should get a
copy of the license.dat file in /var/cfengine/inputs
(Unix) or C:\Program Files\Cfengine\inputs (Windows).
- On the hub, the file /var/cfengine/promise_knowledge.cf should have been
created, and should contain data.
- Finally, after 10–15 minutes3, try to connect to the web server at port 80 on the hub/policy host (for example at http://123.456.789.123).
You should see a login page like the one shown in the figure below:
Figure: Mission Portal login screen
Default user name and password is 'admin' and 'admin' (make sure to change this at first login to prevent unauthorized access; but see also Appendix A on configuration of LDAP).
Note that some of the displays in the Mission Portal may be blank when you log in just after installation; some reports and graphs are only updated every six hours. It may also take some time for the system to fully converge, do not get troubled if initially there are some promises repaired or not kept.
Please see Frequently Asked Questions below or Troubleshooting if you have any problems.
3.2 Frequently Asked Questions
3.2.1 How do I install the prerequisites for the hub manually?
See the bundled INSTALL file for a list of dependencies for the hub (can also be found on the CFEngine software download page: https://cfengine.com/software/).
To install the packages you might want to use yum on Red Hat/CentOS/Fedora,
zypper on SUSE or apt on Debian/Ubuntu.
3.2.2 I did bootstrap the hub before obtaining a license file - what should I do?
Four steps need to be followed to correct this minor issue.
- obtain a working license file and copy it to /var/cfengine/masterfiles
hub # cp /tmp/license.dat /var/cfengine/masterfiles
- killall CFEngine running processes
hub # killall cf-execd cf-serverd cf-monitord cf-hub
- wipe out /var/cfengine/inputs
hub # rm -rf /var/cfengine/inputs
- bootstrap the policy hub
hub # /var/cfengine/bin/cf-agent --bootstrap --policy-server 123.456.789.123
4 Upgrading to CFEngine 3 Enterprise
Please follow the following instructions to the point to ensure a smooth upgrade. When upgrading the software from an earlier version, you should
upgrade the hub (policy server) machine first. Any other hosts
in your network that act as servers for encrypted copy operations
would preferably be upgraded next. This is because a stronger form of
encryption-hash is used in newer versions, which the older servers
cannot understand.
CFEngine packages its software in operating system compatible package
formats (RPM, DEB, PKG, MSI, etc). New packages are made available on the
cfengine.com website; these can be downloaded and installed
in the standard way.
- Go to https://cfengine.com/software (login required)
- Download the particular package for your operating systems
4.1 Upgrade procedure for the hub (and policy)
The following is a general procedure to upgrade to CFEngine 3 Enterprise from earlier versions, please follow each step unless otherwise indicated. It is assumed that the packages are placed in the /tmp directory. To upgrade, start with the hub (policy server):
- Stop all CFE processes
        $ /etc/init.d/cfengine3 stop
     or
        $ for i in cf-execd cf-serverd cf-monitord cf-hub mongod; do pkill $i; done
- Upgrade cfengine-nova and cfengine-nova-expansion (in that order or simultaneously as below):
[RedHat/CentOS/SUSE]
        $ rpm -Uvh /tmp/cfengine-nova-2.2.x-y.x86_64.rpm /tmp/cfengine-nova-
        expansion-2.2.x-y.x86_64.rpm
[Debian/Ubuntu]
        $ dpkg --install /tmp/cfengine-nova_2.2.x-y_x86_64.deb /tmp/cfengine-nova-
        expansion_2.2.x-y_x86_64.deb
- Remove Mongodb lock if present
$ rm -f /var/cfengine/state/mongod.lock
- If you upgrade from CFEngine Enterprise 2.2.0 or 2.2.1, skip this step and go directly to step 7. For all other versions, CFEngine 3 Enterprise's dependencies have changed so we have to correct cf-twin (libgnutls and libmongo.c were updated)
$ cp /var/cfengine/bin/cf-agent /var/cfengine/bin/cf-twin
- Copy the new CFE_ prefixed policy files to $(sys.workdir)/masterfiles (the files with a prefix "CFE_" are maintained by CFEngine, do not make changes to these, they are there to ensure that the Mission Portal works properly).
        $ cd /var/cfengine/share/NovaBase
        $ cp CFE_cfengine.cf CFE_knowledge.cf CFE_hub_specific.cf
        /var/cfengine/masterfiles
Comments (for your information, no need to verify anything):
- Upgrade from Nova 2.0.x (skip this step if you run 2.1.x or higher): Modify contents in /var/cfengine/masterfiles/promises.cf
- Correct input files in
"inputs => {}";
- Change cfengine.cf to CFE_cfengine.cf
- Change knowledge.cf to CFE_knowledge.cf
- Add CFE_hub_specific.cf
- "inputs" should look similiar to this after changes:
                  inputs => {
                             "CFE_cfengine.cf",
                             "CFE_hub_specific.cf",
                             "CFE_knowledge.cf",
                             "update.cf",
                             "cfengine_stdlib.cf",
                             "environment_$(environments.active)/promises.cf",
               	      <YOUR OWN INPUT FILES>
                            };
- Add "commercial_customer" class to
             "bundle common def{}"

             classes:
              "commercial_customer" or => { "nova_edition"},
                         comment => "Define a global class for CFEngine 3 Enterprise",
                          handle => "common_def_classes_commercial_customer";
- Delete the whole
bundle agent cfengine_management{}
(It was moved to CFE_hub_specific.cf)
- Add
"track_value" to "body agent control"
             any:
              track_value => "true";
- If you upgrade from CFEngine Enterprise 2.2.0 or 2.2.1 (skip this step for other versions), modify line 131 in /var/cfengine/masterfiles/update.cf (approximate location, please verify that you change the corresponding content) to ensure automatic updates of the CFEngine packages for the clients. The packages promises changed behavior in the new version and the following modification will make sure that the newest packages up to version 9.9.9 are installed. The original line looks like this:
package_version => "1.0.0", # Install new Nova anyway
The modified line looks like this (i.e. changed the version number):
package_version => "9.9.9", # Install new Nova anyway
- If you run any Windows machines under CFEngine management (CFEngine Enterprise 2.2.x or CFEngine Nova 2.1.x), replace the packages promises in /var/cfengine/masterfiles/update.cf. The original version looks like this:
      packages:
       # update packages after all Cfengine have been killed

       stopped_cfprocs::
        "$(novapkg)"
                       comment => "Update Nova package to a newer version",
                        handle => "update_bins_packages_nova_update_all",
                package_policy => "update",
                package_select => ">=", # picks the newest Nova available
         package_architectures => { "$(pkgarch)" },
               package_version => "1.0.0", # at least Nova version 1.0.0
                package_method => u_generic( "$(local_software_dir)" ),
                    ifvarclass => "nova_edition",
                       classes => u_if_else("bin_update_success", "bin_update_fail");
The modified version looks like this (modified package_version number and added separate section for windows):
     packages:
       # update packages after all CFEngine have been killed

       stopped_cfprocs.!windows::
        "$(novapkg)"
                       comment => "Update Nova package to a newer version",
                        handle => "update_bins_packages_nova_update_all",
                package_policy => "update",
                package_select => ">=",           # picks the newest Nova available
         package_architectures => { "$(pkgarch)" },
               package_version => "9.9.9",        # Install new Nova anyway
                package_method => u_generic( "$(local_software_dir)" ),
                    ifvarclass => "nova_edition",
                       classes => u_if_else("bin_update_success", "bin_update_fail");

       stopped_cfprocs.windows::
        "$(novapkg)"
                       comment => "Update Nova package to a newer version",
                        handle => "update_bins_packages_nova_update_all",
                package_policy => "update",
                package_select => ">=",           # picks the newest Nova available
         package_architectures => { "$(pkgarch)" },
               package_version => "9.9.9.9",      # Install new Nova anyway
                package_method => u_generic( "$(local_software_dir)" ),
                    ifvarclass => "nova_edition",
                       classes => u_if_else("bin_update_success", "bin_update_fail");
- If you upgrade from CFEngine Nova 2.1.x or earlier, modify line 298 in
/var/cfengine/masterfiles/update.cf (approximate location, please verify that you change the corresponding content) to run mongod without journaling. The original line looks like this (line has been split and indented for presentability):
        "/var/cfengine/bin/mongod --fork --logpath /var/log/mongod.log --dbpath
           $(sys.workdir)/state --bind_ip 127.0.0.1 --nohttpinterface > /dev/null
           < /dev/null 2>&1"
The modified line looks like this (add --nojournal --logappend; line has been split and indented for presentability):
        "/var/cfengine/bin/mongod --fork --logpath /var/log/mongod.log --dbpath
           $(sys.workdir)/state --bind_ip 127.0.0.1 --nohttpinterface --nojournal
           --logappend > /dev/null < /dev/null 2>&1"
As a final part of step 9, copy the modified update.cf to the inputs directory:
$ cp /var/cfengine/masterfiles/update.cf /var/cfengine/inputs/update.cf
- Tidy up $(sys.doc_root) directory
[Debian/Ubuntu]
$ rm -rf /var/www/*
[RHEL/CentOS]
$ rm -rf /var/www/html/*
[SLES/openSUSE]
$ rm -rf /srv/www/htdocs/*
- Restart CFEngine processes
        $ /etc/init.d/cfengine3 start
     or
        $ /var/cfengine/bin/cf-execd
- You will need to re-initialize the MongoDB if you have trouble logging in after upgrade, see See First time login to Mission Portal fails.
4.2 Upgrade procedure for the clients
For client upgrades there are 2 approaches: manual or automatic upgrade.
- Manual: Update cfengine-nova on each client by
rpm, dpkg or corresponding Windows command. For Linux/UNIX systems, update cf-twin as described in step 4 in the upgrade procedure for the hub (i.e. overwrite the old cf-twin). For Windows systems copy/overwrite the content of
C:\Program Files\Cfengine\bin
to
C:\Program Files\Cfengine\bin-twin
- Automatic: On the hub, copy the cfengine-nova packages to the operating system specific distribution directories in /var/cfengine/master_software_updates (i.e. put the files in the respective operating specific subdirectories) and CFEngine 3 Enterprise will take care of the rest.
4.3 Upgrade procedure for the standard library
When all clients have been upgraded to CFEngine 3 Enterprise 2.2.x, i.e. you have completed both hub and client upgrades as described above, copy the most recent standard library to /var/cfengine/masterfiles on the hub (note that the new library version is incompatible with versions of CFEngine 3 Enterprise older than 2.2.0):
$ cp /var/cfengine/share/NovaBase/cfengine_stdlib.cf /var/cfengine/masterfiles
4.4 How can I do phased deployment?
Using CFEngine classes to select a subset of machines, you can deploy of updates on a small
number of test systems first.
4.5 What if I have multiple operating system platforms?
As of version 1.1 of CFEngine Nova, CFEngine will look for updates in an operating specific
location on the policy server. To update a particular operating system, you only need to place
its package in the correct subdirectory and the client host will know where to look.
4.6 How do CFEngine 3 Enterprise policies update if I already have my own policy?
New CFEngine package updates will not overwrite your existing policy. That means that they
will also not improve your current updating arrangement without your approval.
|
If you want to make use of CFEngine’s enhancements to standard policy files like
‘update.cf’, you need to examine and integrate these changes to your policy server manually.
Update the software before updating policy, as new policy might require new features in
the software.
|
If you require assistance upgrading, contact CFEngine Support.
4.7 How do I upgrade from CFEngine Community 3 to CFEngine 3 Enterprise?
CFEngine 3 Enterprise comes with policies that are specific to Enterprise functionality, we therefore urge you to set aside your
current community policy. Install CFEngine 3 Enterprise, set up the Enterprise hub by
following this document, and then integrate your existing
policy to the hub manually, in small testable steps.
CFEngine 3 Enterprise is compatible with the Community Edition of CFEngine 3 for distributing policies, but
some process files are now managed by CFEngine 3 Enterprise and reporting will not work in the CFEngine 3 Enterprise Mission Portal.
Please see Troubleshooting if you have any problems.
5 Mission Portal
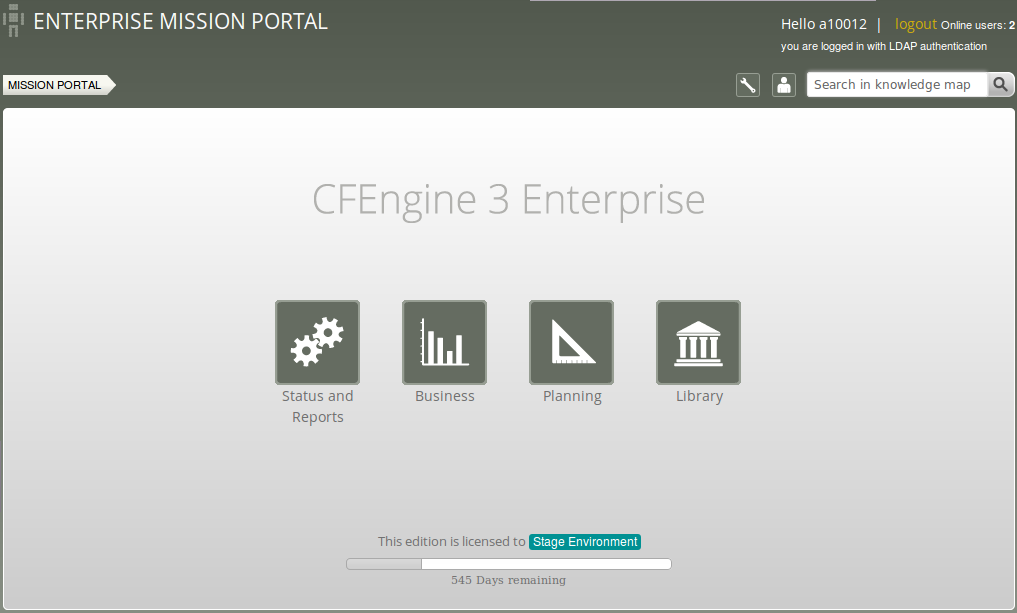
The Mission Portal is the centerpiece
of user interaction with CFEngine 3 Enterprise. It can be accessed by connecting to the hub (policy server) with your web browser (for example at http://123.456.789.123; default port 80). From here you can get a complete overview of operations and performance, business and compliance, organizational knowledge and library.
Figure: The mission portal
5.1 Mission Portal Rooms
There are four main rooms in the Mission Portal that offer insight into different aspects of operations:
- Mission Status and Reports: a place to see the current state of system repair
- Mission Business: a top level overview of compliance status and business value
- Mission Planning: a place to plan and make policy changes
- Mission Library: a knowledge bank that connects information together
Each of these rooms is a beginning from which you can refine your overview and search
through information.
In CFEngine 3 Enterprise 2.2.2 it is possible to toggle on or off the display of the Business and Planning rooms, see Mission Portal Settings for more information.
5.1.1 Mission Status and Reports
Mission Status and Reports illustrates the state of the system in relation to the desired state at all scales. Zoom in to specific areas and examine the impact of promises, query data, and extract reports.
The Mission Status and Reports room (previously Engineering room) underwent a substantial rework for the release of CFEngine 3 Enterprise 2.2. Most notably we introduced a host Navigation Tree where hosts can be grouped and organized in a hierarchy defined by classes. The remaining content on the page is influenced by the selected tree context, i.e. the Status and Reports tabs will only show information for linux hosts if such a context/node is selected in the the tree (the active node is highlighted to show that it is selected). Another notable change is the new interface to interact with reports, now available as a tab and drop-down menus.

Figure: Mission Status and Reports
5.1.1.1 Navigation Tree
The Navigation Tree consists of two main parts:
- Top menu:
Figure: Top Menu
- The Tree Selector: Dropdown menu; choose between the default tree and custom trees defined by the user. Each tree can have a different subset of nodes. Click
Add in the dropdown menu to add your own tree (input the name of the new tree in the field next to the add button). Click X next to a tree name to delete it.
- Class finder, Host finder and Promise finder (see separate section Finders)
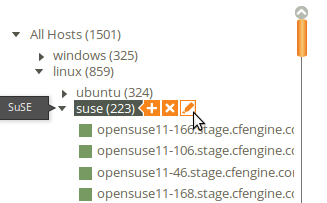
- The tree itself, grouped by classes. The user can add up to four sublevels in the Navigation Tree and edit or delete existing nodes.
Figure: Navigation Tree
- To add a node:
- Put the mouse pointer over the node you wish to add a sublevel to, click the plus sign shown beside the node.
- A pop-up appears with fields to enter a label (name) to the node that you wish to create and the class expression you wish to filter by. The class expression field contains a button which opens a class finder to help you select classes.
- To delete a node: Put the mouse pointer over the node that you wish to delete, click the
X shown beside the node.
- To edit a node:
- Put the mouse pointer over the node that you wish to edit, click the
Pencil icon shown beside the node.
- A pop-up appears where you can edit the fields that you wish to change.
The trees and nodes that a user creates will not be visible to other users of the Mission Portal.
Click on any host in the tree to get a quick overview of that host in the status tab. Click the host name under the compliance graph to see more detailed information about the host (see also Host viewer).
5.1.1.2 Status tab
The Status tab shows the overall status of the hosts selected in the Navigation Tree. This section contains:
- Selected context: Shows the context (combination of selected classes) for which the data is valid.
- Compliance Summary: The row of bars shows the compliance of all registered hosts in blocks of five minutes for the last six hours or for the last week (depending on which is selected at the bottom of the graph)4. The hosts are classified into red, yellow and green according to the status of their compliance (see below). The height of a bar corresponds to the number of registered hosts. Note that the last column may have a lower height than the others (i.e. show information for fewer hosts)5. Click on a bar to see which promises were repaired or not kept.
- Host Compliance (last hour): The hosts are classified into red, yellow and green according to the status of their compliance over the last hour:
- A host is red if more than 20% of its promises are not kept
- A host is yellow if 20% or more of its promises were repaired and host is now compliant (> 20% repaired, now compliant)
- A host is green if more than 80% of its promises are kept (> 80% compliant)
- Host Operations: The hosts are classified into blue and black according to their operational status.
- A host is blue if there has not been any contact between the hub and the client within a set time interval (host unreachable; default value is set to 15 minutes, see Mission Portal Settings).
- A host is black if CFEngine's scheduling daemon,
execd, is not running (the hub will still able to contact the client to collect reports but the client will return stale data since it has not been running at regular intervals).
- Clicking a link in any of the above categories (red/yellow/green/blue/black) produces a list of the hosts in that category (in the above mentioned context).
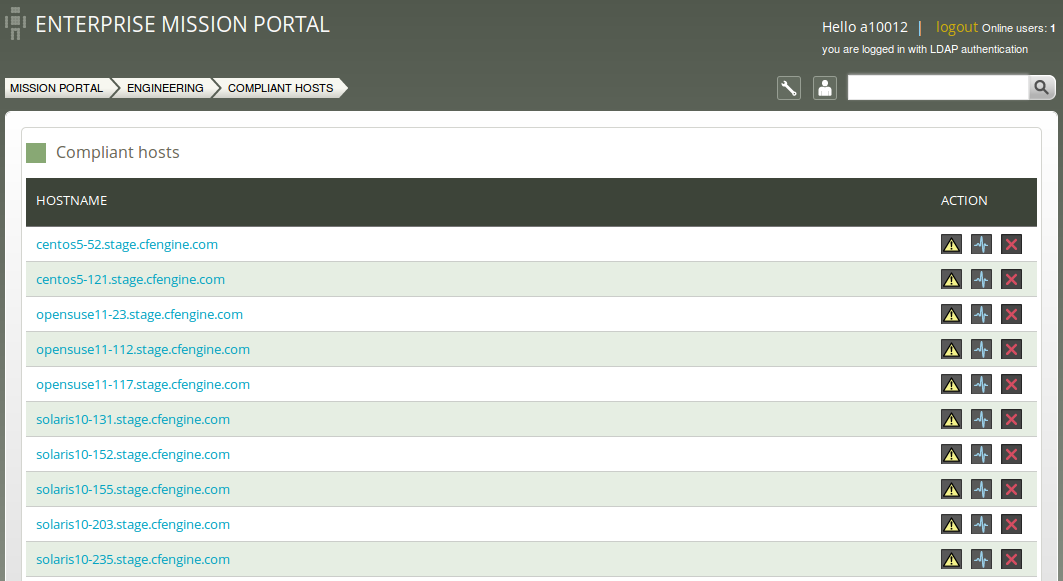
Example, Compliant hosts: Click the link next to the green box under Host Compliance, a report appears showing host names, time stamp of last data collected and three action icons:
Figure: Compliant hosts
Action icons:
- Yellow warning triangle: View the promises not kept on this host
- Pulse line: View vitals signs (statistics) on this host
- Red X: Delete this host (host will be deleted from database, but may re-appear if CFEngine is still running on it; see footnote below).6
5.1.1.3 Reports tab
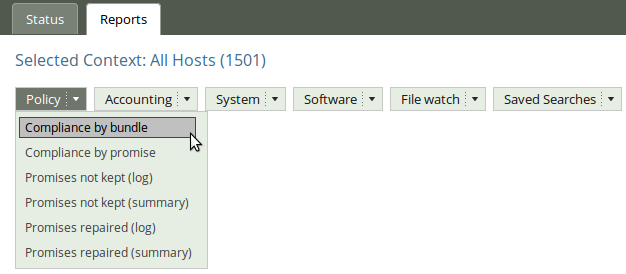
Reports are sorted into five main categories that contain drop down menus to select default reports. Clicking a report will bring up a search filter specific to that report.
Figure: Reports tab
Reports are updated at different intervals, the default values are every 5 minutes or every 6 hours (this can be changed by the user). Below is a list of standard reports, updated every 5 minutes unless otherwise noted:
- Policy
- Compliance by bundle: Status of promise bundles and when they were last verified
- Compliance by promise: Compliance of each promise individually
- Promises repaired log: Log of actual repairs made to the system
- Promises repaired summary: Cumulative (histogram) summary of promises repaired
- Promises not kept log: Log of promises that could not or would not be kept
- Promises not kept summary: Cumulative (histogram) summary of promises not kept
- Accounting
- Compliance summary: Total summary of host compliance
- Business value report: Accumulated value of promises kept (6 hrs)
- Benchmarks: Execution time used to verify selected promises
- System
- Context classes: User defined classes observed on the system
- Last saw neighbours: Log of when neighboring hosts were last observed online
- Variables: Table of variable values last observed (6 hrs)
- Software
- Patches available: A list of patches currently claimed to be available by the local package manager
- Patch installed: A list of (un)applied patches according to the local package manager
- Installed: List of software packages claimed to be installed according to the local package manager
- File watch
- Change summary: Log of all detected changes to files from changes promises
- Text changes: Delta/difference comparison showing file changes
- Setuid: Current list of observed setuid/setgid root programs (6 hrs)
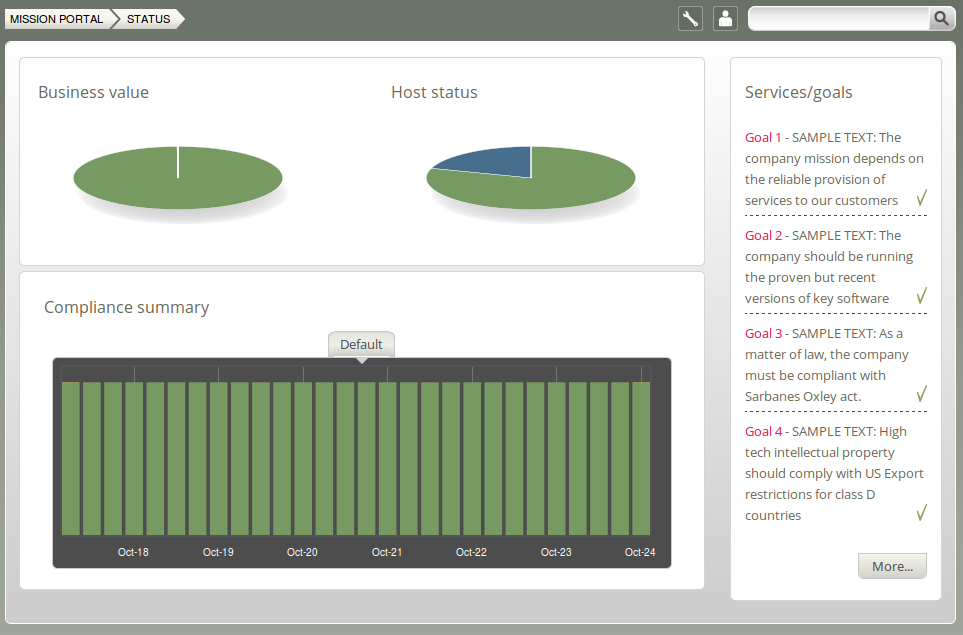
5.1.2 Mission Business
Mission Business is a high level summary of how well the entire system is behaving.
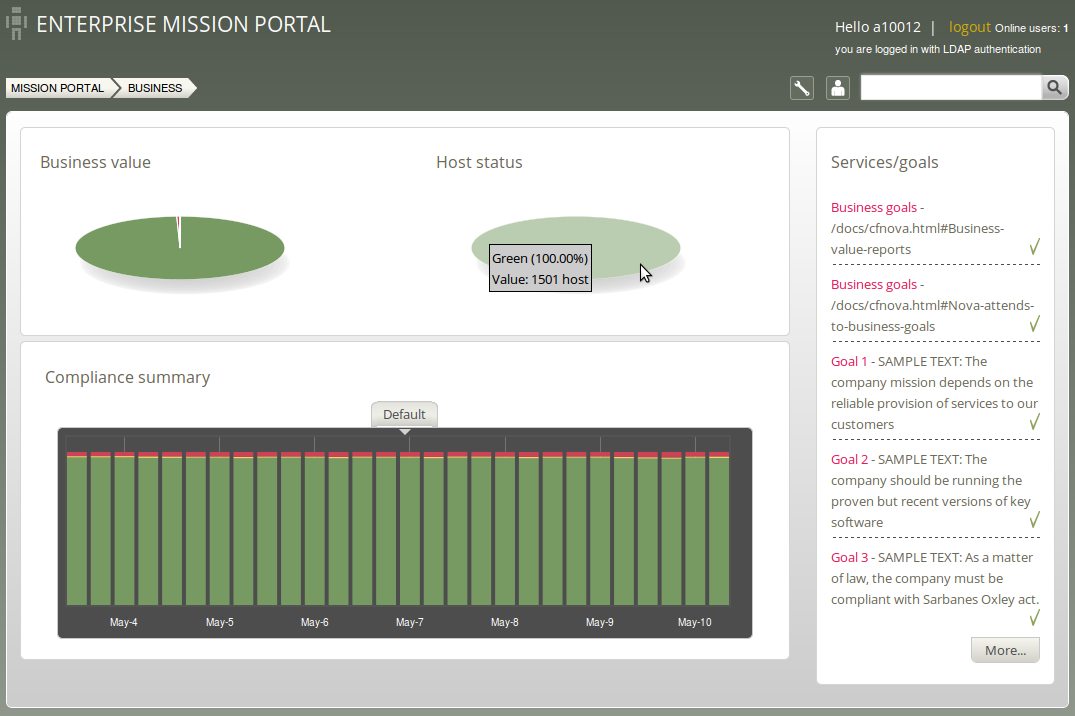
Figure: The business status of IT operations.
Business Value and Host Status:
The two pie charts show the business value (measured as arbitrary monetary units, 'mu') of the promises kept/not kept and host status, respectively. Business value is associated with the value of promises as defined by in policy files. In the Host Status chart, each host represents a slice of the pie and is classified into red, yellow, green and blue according to the level of their compliance. A host is red if less than 80% of its promises are kept, yellow if 20% or more of its promises were repaired and host is now compliant, green if more than 80% of its promises are kept, and blue if there is no contact between the hub and the client host (unreachable).
Compliance Summary:
The row of bar meters shows the compliance (average percentage of promises kept, repaired or not kept) of all registered hosts 7 in blocks of 6 hours for the past week. It summarizes performance and anomalous behavior in a simple red (promises not kept), yellow (promises repaired) and green (promises kept) scale. Click on a bar to see which promises were kept/not kept.
Services/Goals: A summary of Mission goals (as defined in user policy files; these examples are from company_knowledge.cf). Edit the file in the policy editor (Planning room -> repository), or edit the file in your own text editor, to change these goals.
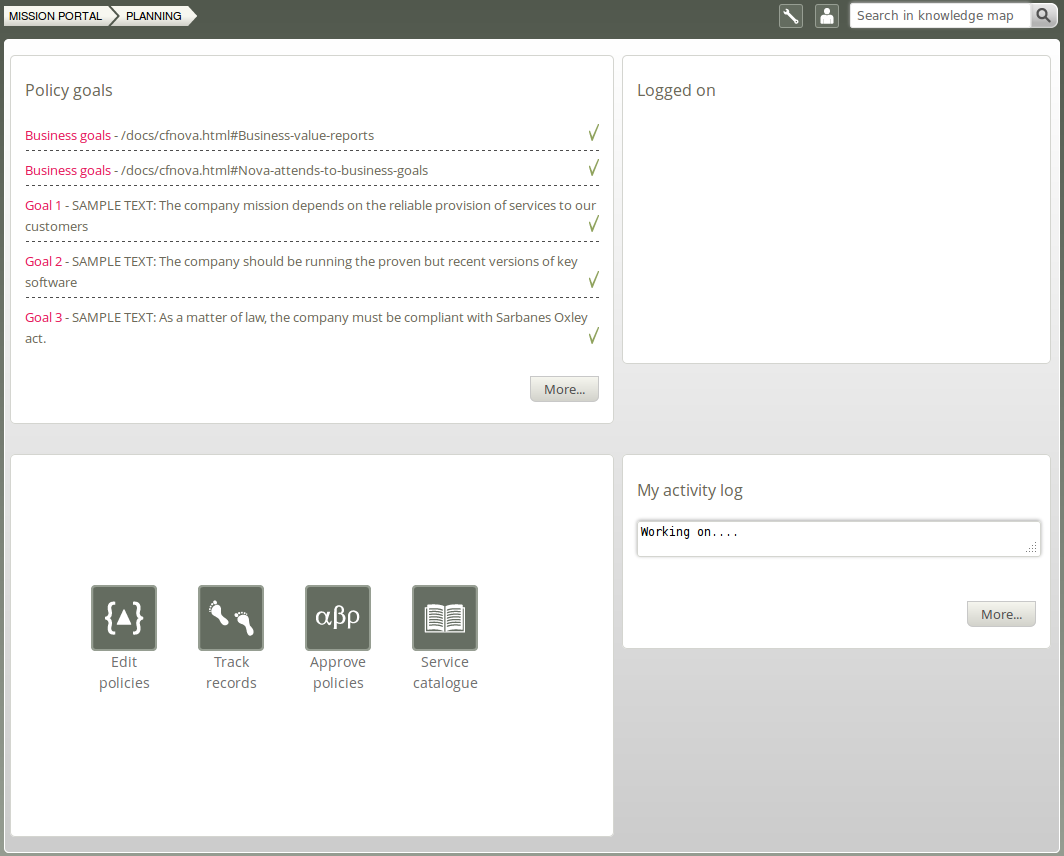
5.1.3 Mission Planning
Make changes to policies, goals determined by promises and implement specific tactics to achieve the desired state. Interact with data, approve changes and anomalies. Get an overview of users logged on to the Mission Portal, as well as their current activity.
Figure: Mission Planning
Policy Goals:
List of policy goals as defined in policy files; these examples are from company_knowledge.cf. Edit the file in the policy editor (Planning room -> repository) or edit the file in your own text editor. The "More..." button links to the Service Catalogue, click to see which bundles contribute to these policy goals.
Action buttons:
- Edit policies: Edit policy files in the integrated policy editor (requires Subversion)
- Track records: Overview of promises repaired or not kept
- Approve policies: To be developed
- Service catalogue: See which bundles contribute to policy goals
Logged on:
Shows users currently logged on to the Mission Portal and their activity.
Activity log:
Shows the latest activity entries. Type in a new activity to keep colleagues posted on current work.
5.1.4 Mission Library
The Library contains finders for documents, topics, a notes archive, and (external) link to the CFEngine community.
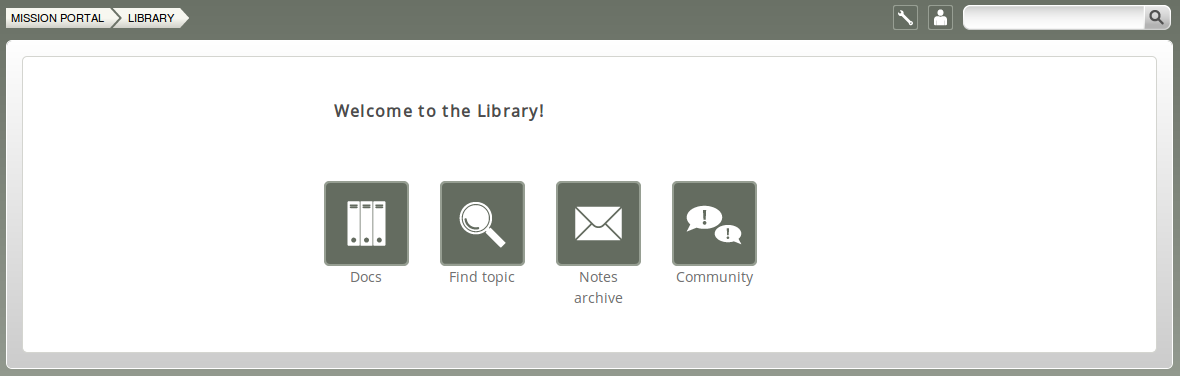
Figure: Mission Library
Library buttons:
- Docs: Overview of documentation that was packaged with CFEngine 3 Enterprise.
- Find Topic: Search for topics either by scrolling through the alphabetical list or by typing in the search box (same as the search box on top right of page).
- Notes Archive: Get overview of all notes made in regard to hosts or reports.
- Community: External link to the CFEngine community
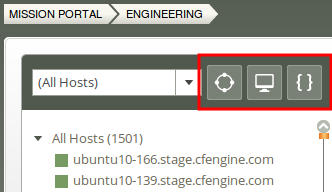
5.2 Finders
Finders are modules that make it simple and intuitive to browse and search for objects of a particular type. There are three finders in the Mission Status and Reports room and one in the Mission Library. The finders in Mission Status and Reports are located above the Navigation Tree (encircled in red below: Class finder, Host finder and Promise finder):
Figure: Finders in the Mission Status and Reports room
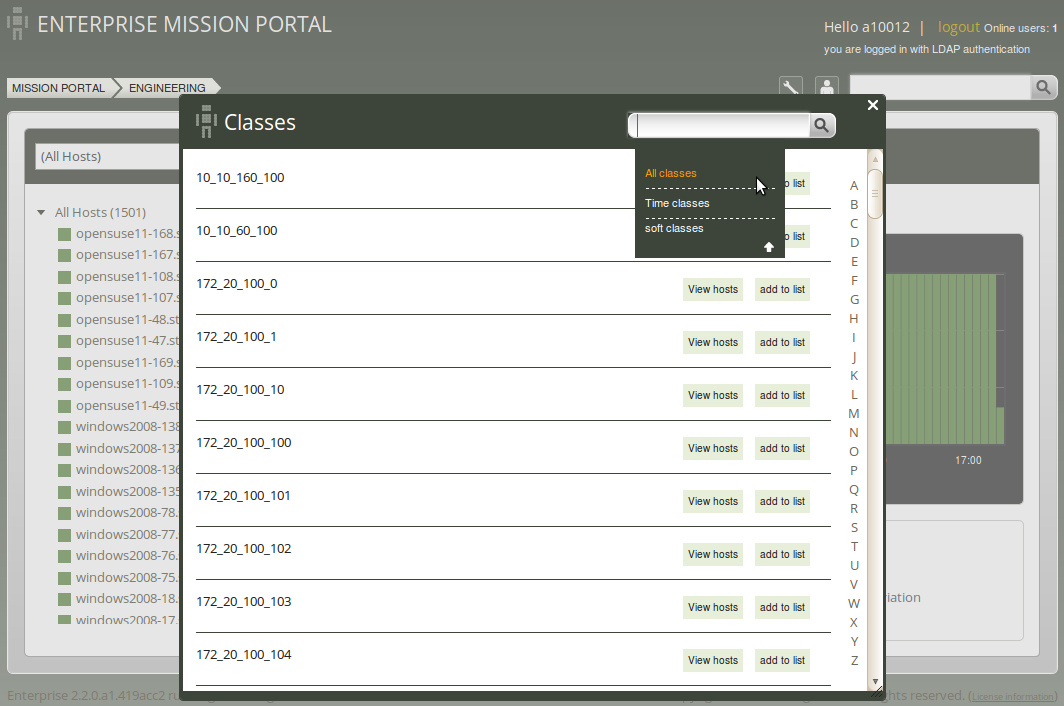
5.2.1 Class finder
The class finder is located in the Mission Status and Reports room and will display a list of classes to search by. Browse by scrolling through the list, click a letter corresponding to the first letter of a class name, or search for classes in the search box (top right corner; choose between searching all, time, soft or IP classes). Clicking on a class will bring you to a report for that class profile.
Figure: Class finder.
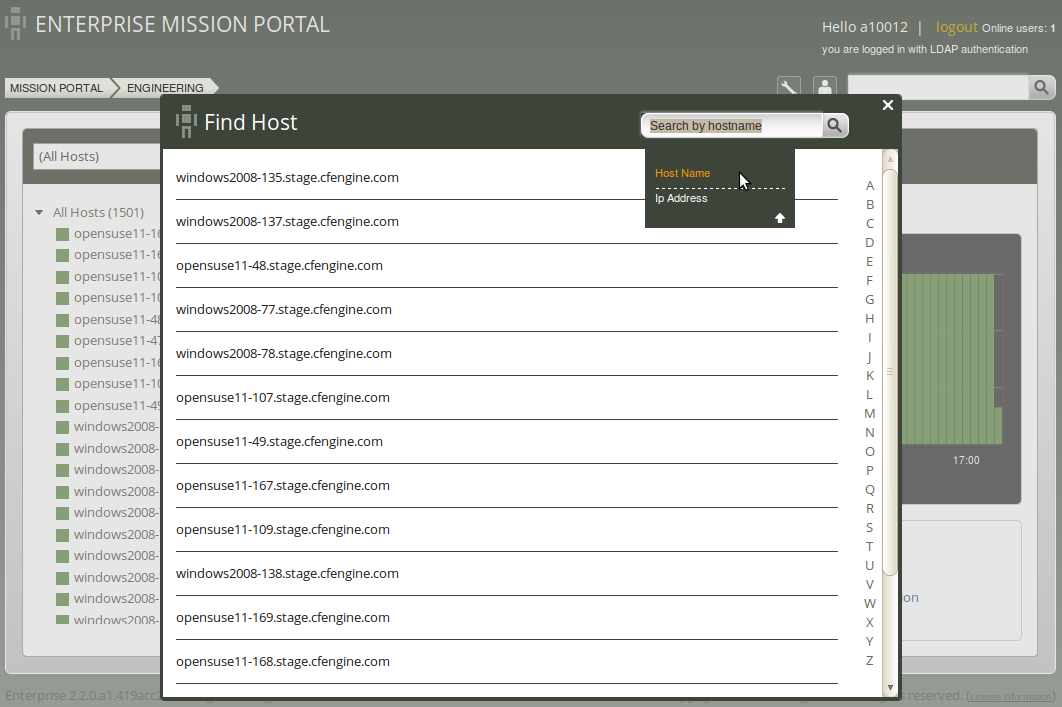
5.2.2 Host finder
The host finder is located in the Mission Status and Reports room and will display a list of hosts. Browse by scrolling through the list, click a letter corresponding to the first letter of a host name, or search for hosts in the search box (top right corner). Clicking on a host name will bring you to the host viewer.
Figure: Host finder
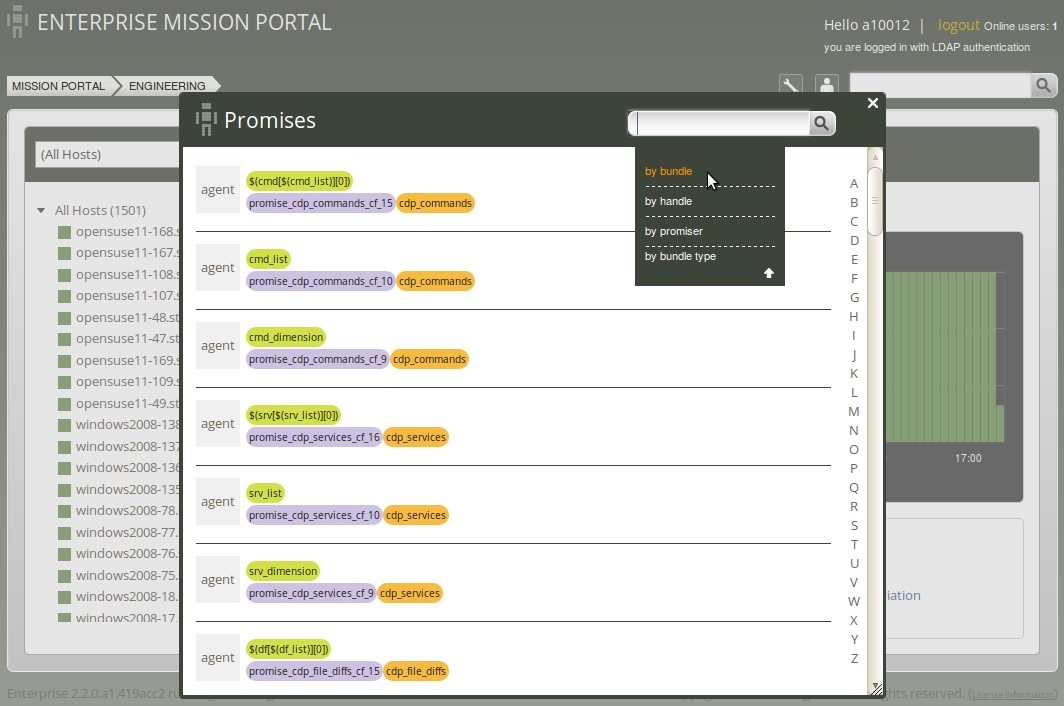
5.2.3 Promise finder
The promise finder is located in the Mission Status and Reports room and will display a list of promises. Browse by scrolling through the list, click a letter corresponding to the first letter of a promiser/bundle/handle name (set alternative in search box and click a letter in the right column), or search for promiser/bundle/handle in the search box (top right corner; choose between searching promiser, bundle, or handle). Clicking on a promise/bundle will bring you to the promise/bundle viewer.
Figure: Promise finder
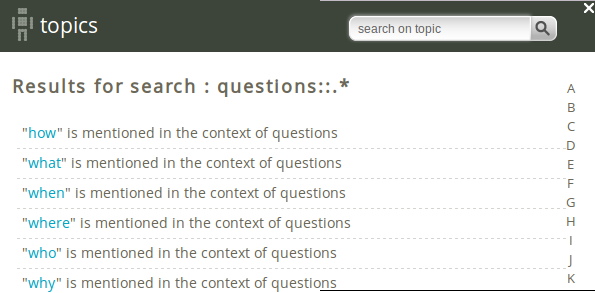
5.2.4 Topic finder
The Topic finder is located in the Mission Library and will display a list of general questions (how, what, when, where, who, why) that can serve as entry points to start exploring the CFEngine knowledge module. Browse other topics by clicking a letter corresponding to the first letter of a topic name or look for topics in the search box (top right corner). Clicking on a topic will bring you either to a document, web page or the Topic viewer (Knowledge map).
Figure: Topic finder
5.3 Viewers
Viewers show info about the main objects at different scales of the system.
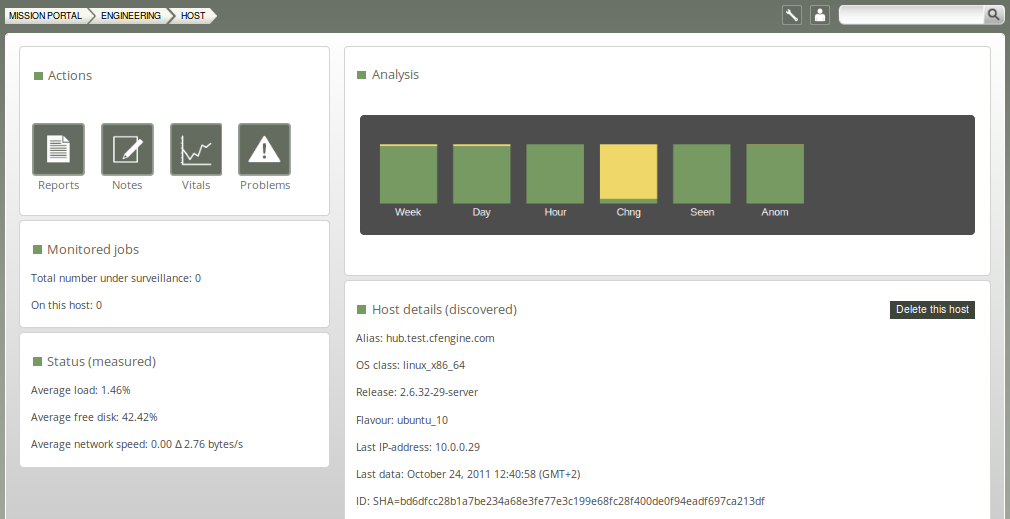
5.3.1 Host viewer
Shows information about hosts, including name, status, operating system, vital signs, promises not kept, standard and custom reports, and more. View and make notes about the host.
Figure: Host viewer
Action buttons:
- Reports: Opens a report finder that gives access to different reports: a tabular summary of the host's internal information, tailored to a particular topics
- Notes: View and make comments about this host
- Vitals: Overview of monitoring data for this host and its current performance statistics
- Problems: Overview of promises not kept by this host
Monitored jobs:
The number of jobs that have been set to be monitored explicitly by CFEngine (this is defined in user policy).
Analysis:
The bar meter shows the host-summary status of a number of key performance indicators:
- Week: The average level of promise-compliance over the whole past week.
- Day: The average level of promise-compliance over the past day.
- Hour: The average level of promise-compliance over the past hour.
- Perf: The average performance status of the system, compared to the learned norm.
- Chng: Software update status of the system (only shows on hub, not displayed on clients).
- Seen: The average level of connectivity compliance (to the hub) over the past week .
- Anom: Level of anomalous site-wide activity on the system.
Host details (discovered):
Lists properties that CFEninge has discovered about the host (alias (name), operating system, release version of operating system, etc.). You can also delete this host by pressing the button on the right (host will be deleted from database, but may re-appear if CFEngine is still running on it; see footnote below).8
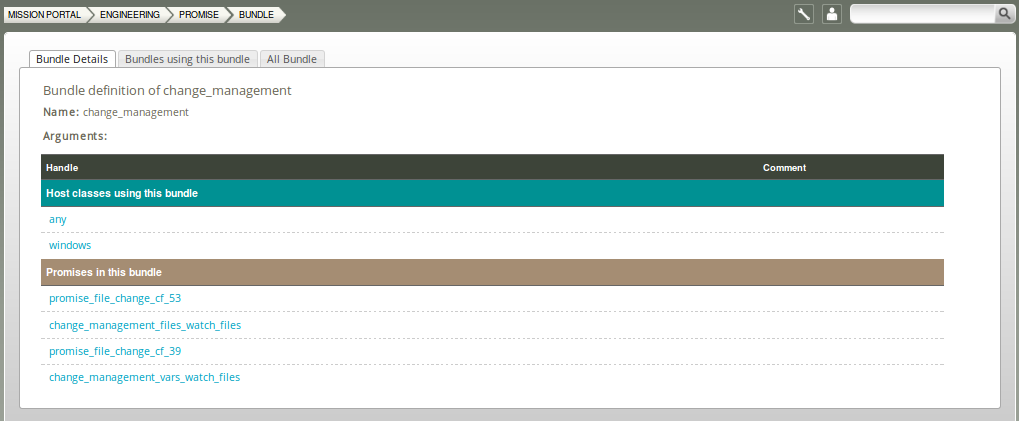
5.3.2 Bundle viewer
The bundle viewer provides an interface to explore the context (class) in which a bundle is used and the promises made within that bundle. Tabs display other bundles using the one currently viewed and a general overview of all bundles. Navigate to interact with other views and get a complete picture of context, leads, references, affected objects, similar topics, and more.
Figure: Bundle viewer
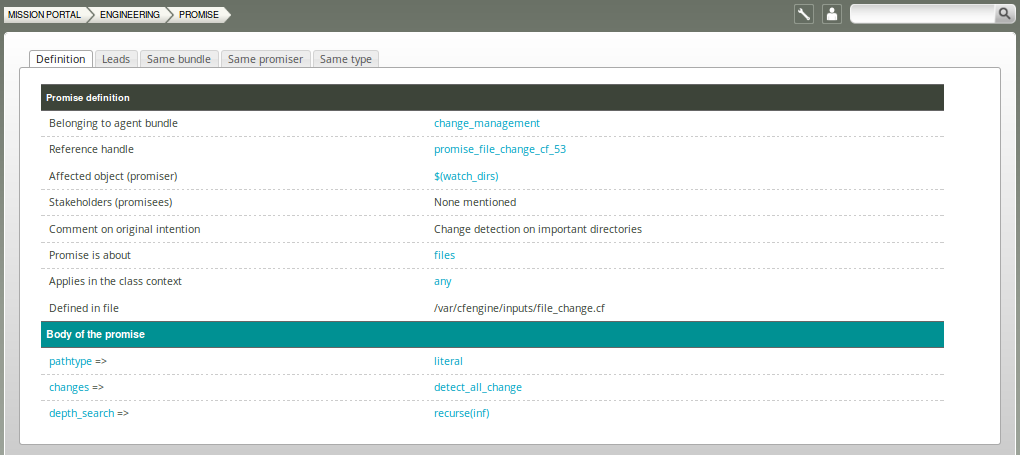
5.3.3 Promise viewer
The promise viewer shows a promise definition and body. There are tabs for viewing leads (promise type, context, dependencies), other promises used in same bundle, other promises made by same promiser, and other promises of same type.
Figure: Promise viewer
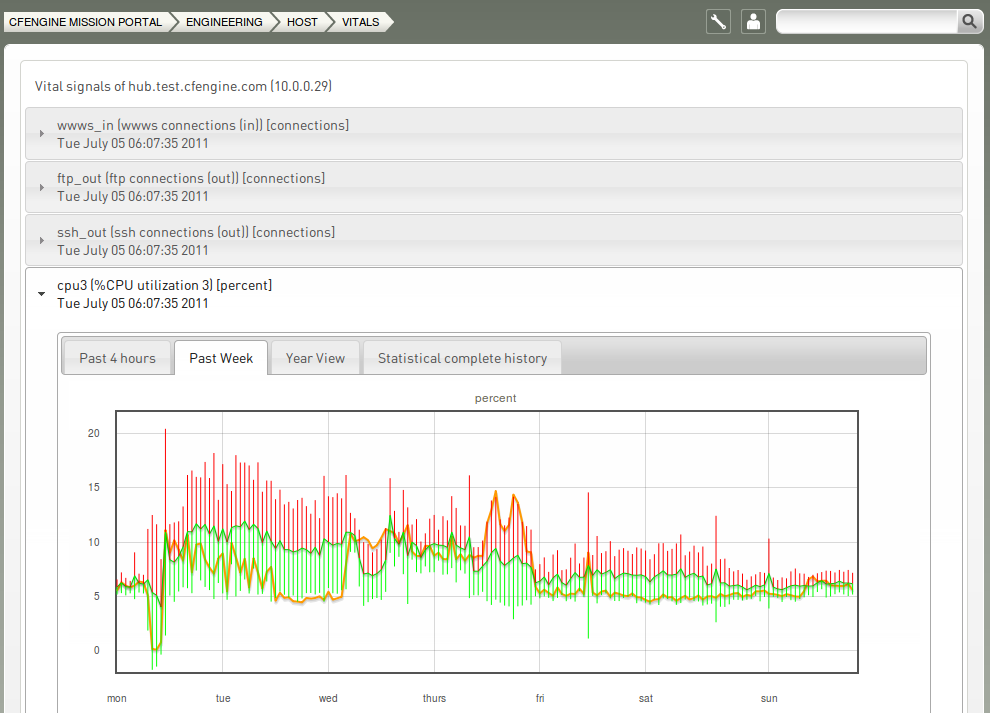
5.3.4 Vital signs viewer
The Vital signs viewer shows an
overview of monitoring data from each host and its current performance
statistics. In order to see data in these graphs, each host in the CFEngine
managed network must be running cf-monitord and cf-serverd.
This is the default behavior for a CFEngine 3 Enterprise installation.
Figure: Vital signs viewer
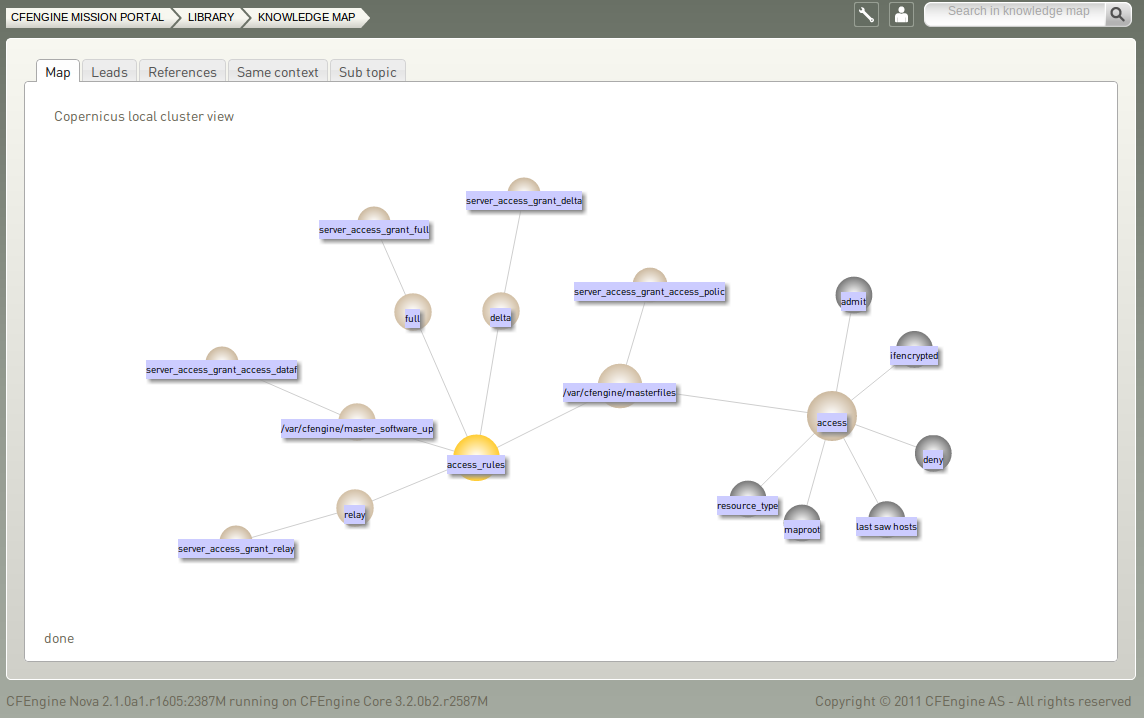
5.3.5 Topics viewer (Knowledge map)
The Topics viewer, or Knowledge map, is a sematic web of subject references and document pointers. In a semantic web, you are presented with links to
documents about your chosen topic. In addition you are
offered leads and possible pathways to topics that are known to be
related. These leads don't just point you to more documents, but
explain how neighboring issues are related. The aim is to help
the user learn from the experience of browsing, by conveying the
meaning of the current topic in relation to other issues in the
system. This is how knowledge transfer occurs.
The Knowledge Map can be found by searching for a topic in the top right corner or through the topic finder in the Mission Library (this will sometimes also lead directly to a document or web page instead).
Figure: Topics viewer (Knowledge map)
The yellow sphere represents the current topic, surrounding (blue) spheres represent related topics, and the size of the spheres represents the number of associations each topic has. This map is navigable: click on a different topic to see a new view centered on that topic and its associations. The tabs will show leads, references, topics in the same context, and sub topics in the same context. Links can also lead to other viewers in the Mission Portal, documents and web pages related to the current topic.
5.3.6 Report viewer
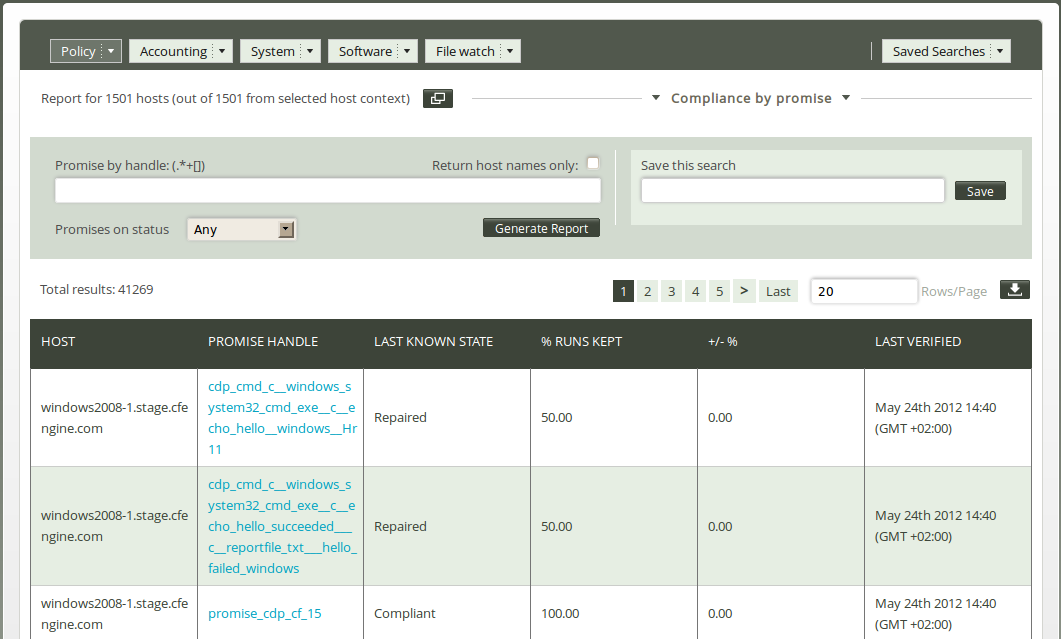
A significant capability of CFEngine 3 Enterprise is the existence of automated system reporting. A report is a tabular summary of CFEngine's internal information, tailored to a particular purpose. Reports describe attributes and qualities of managed hosts.
Figure: Report viewer
The drop down menu from the Status and Reports room Reports tab (where the user can choose which report to view) can also be found on the top of all reports, as well as a drop down menu to fetch saved report searches. Clicking a different report or saved search from one of these menus will refresh the page content to reflect the selection.
The Report viewer also comes with different tools to drill down to specific information in the current report. To assist in this, the top line shows for how many hosts the report is valid for, along with an icon for selecting host context (the host context is pre-populated with data from the selected node in the Navigation Tree) and the title of the current report.
Figure: Report context
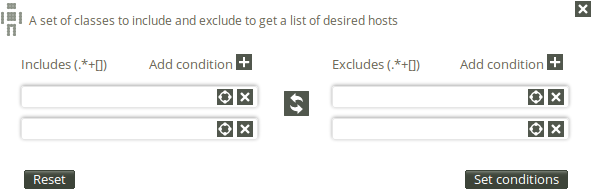
Clicking the icon for selecting host context will bring up a window where the user can choose classes to include and exclude in a refined search on the current report (excludes takes priority over includes):
Figure: Set report host context
The report can also be refined through the specific report filter (here we can refine by searching for promise handles):
Figure: Report filter
5.4 Editors
5.4.1 Policy editor
The CFEngine 3 Enterprise Mission Portal provides an editor for working on
CFEngine language. The editor provides syntax high-lighting and look-up to make working
with CFEngine's extensive language easier. There is a tie-in for Subversion version
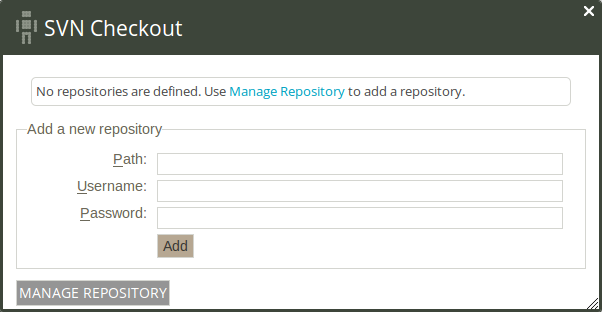
control repositories; the Mission Portal will prompt you for the path and login credentials. Setup of a subversion repository has to be done separately.
Figure: SVN checkout
The main key commands in the editor Window are:
- Auto completion: Ctrl+Space
- Shows a pop-up menu of possible items. This is context sensitive,
e.g. it also works inside lists (e.g.
bsdflags) to provide
possible values.
- Undo: Ctrl+Z
- In Safari, Ctrl-backspace may be used.
- Redo: Ctrl+Y
- Undo an undo operation, i.e. reverse the direction of transaction roll.
- Indent: TAB
- Format a file to a standard indentation.
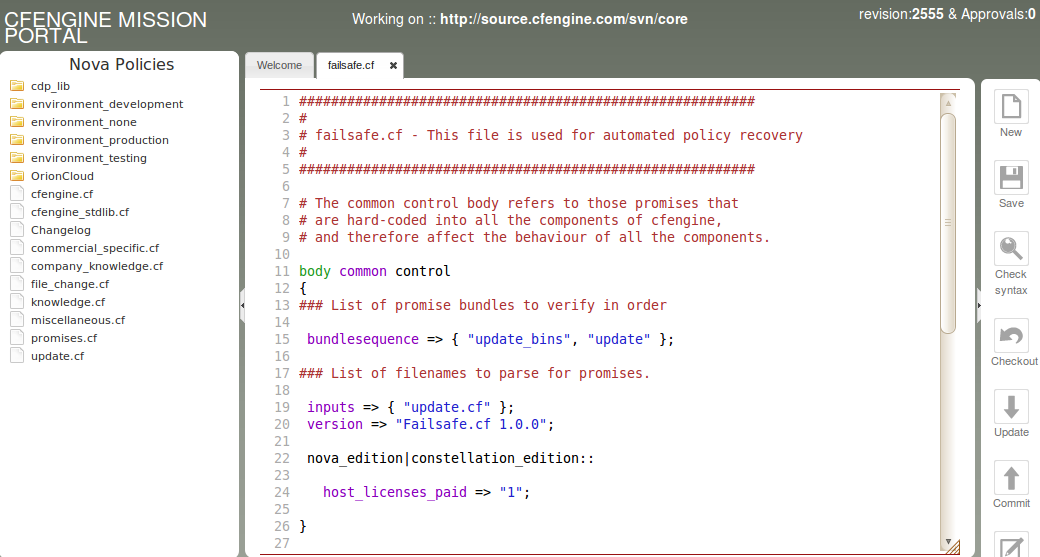
Multiple documents appear as tabs along the top of the screen.
Figure: The Policy Editor
The CFEngine 3 Enterprise policy editor detects syntax errors and highlights
these in red to avoid mistakes when editing. In addition, by using
the Check syntax button, it is possible to pre-test the policy
before committing changes to a repository. This will run
promises.cf through the cf-promises parser.
The main menu on the left hand panel shows the main work flow items for
policy editing. Clicking the arrow in the panel divider collapses the
menu and gives full-screen editing.
The right hand panel shows basic file and Subversion commands. The Save button will store a local/version of the opened files without committing to the repository.
5.4.2 Integration with subversion
The default architecture proposes to work in close dialog with a version
repository. CFEngine recommends the use of such a repository and currently
supports subversion.
todo2 For the moment, user management in the Mission Portal only concerns access to the Mission Portal settings and, through role-based access control, access to hosts, repo. It does not affect the ability to edit or approve policies in the policy editor. Access control and authorization for policies are handled by
subversion's authentication system so that edits made in the Mission
Portal can be interleaved with edits from other sources. The
subversion repository thus becomes the centerpiece of the distributed
coordination, as is the intended function of version control systems.
When working with a subversion repository, you first do a
”checkout”. This allows you to select the repository you want to
download and creates a working environment based on it. Note that the
editor currently only views files in the checked out repository, so if
you have a directory hierarchy, you need to check out multiple
times. After doing a checkout, you can view the path to the current
repository at the top.
The ”update” command downloads the newest files from the already checked
out subversion repository, while ”commit” updates the repository
with your working copy. After editing you may or may not commit changes. When closing an
edited file, you are also given the option to commit at once. You also have the ability to see the
repository log of the 20 last changes; this includes changed files,
users and log messages.
The menu choice to commit a current version commits all files in the
configuration repository. Commits require a mandatory comment. CFEngine recommends
you use this to explain why a change was made, or relate it to an incident number, etc.
The details of what was changed are already documented by the version control
logs.
Per default there are no automatic updates from the subversion repository to masterfiles as users may want to review changes before they go live. You would either need to copy new policies manually to /var/cfengine/masterfiles on the hub, or check out your subversion repository there and run svn update. It is however possible to set up automatic updates using CFEngine, for example by adding the following to your policy:
commands:

  am_policy_hub::

  "/usr/bin/svn update --non-interactive"

     comment => "Update masterfiles if new changes have been committed",
     contain => silent_in_dir("/var/cfengine/masterfiles");
For more detailed information on working with subversion, see http://svnbook.red-bean.com.
5.5 Mission Portal Administration
5.5.1 User Settings and Preferences
Click the tool icon on the top right (encircled in red) to configure and view various settings for the Mission Portal.
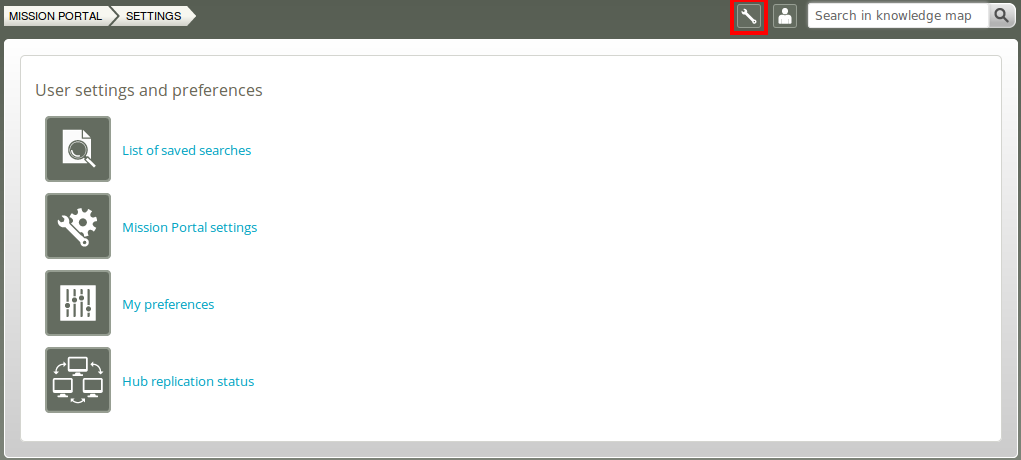
Figure: User Settings and Preferences
Setting options allow you to view or set:
- List of saved searches: View saved searches (e.g. searches saved from different reports)
- Mission Portal settings: Set or edit the administrative email, administrative role, authentication method, activation of role based access control (RBAC) and the unreachable (blue host) threshold.
- My preferences: Turn tool tips on/off and define default number of rows to be shown in reports
- Hub replication status: Display status of redundant monitoring hubs (if activated)
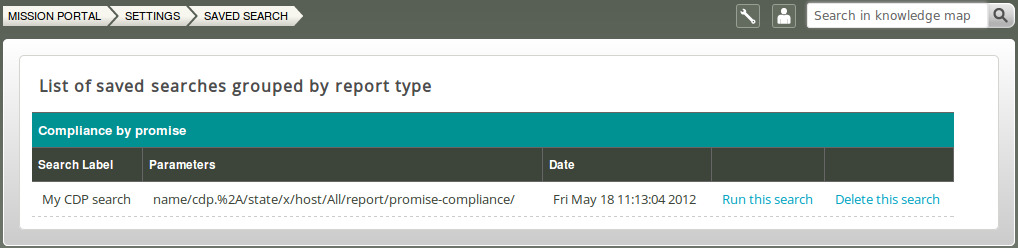
5.5.1.1 List of saved searches
View a list of all searches that have been saved from different reports. Saved searches are user-specific (i.e. will not be seen by other users). You can choose to run or delete specific searches.
Figure: List of saved searches
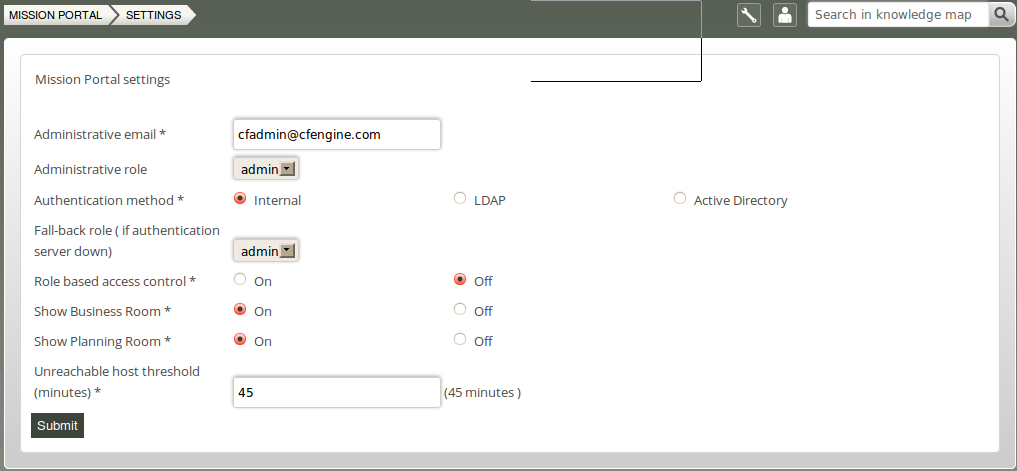
5.5.1.2 Mission Portal Settings
Mission Portal settings allow the user to set or edit the administrative email, administrative role, authentication method, activation of role based access control (RBAC), show/hide the Business and Planning rooms on the Mission Portal front page, and the unreachable (blue host) threshold.
Figure: Mission Portal Settings
Administrative email:
This is the email address that the Mission Portal uses to send reports.
Administrative role:
Select which user group will have general administrator privileges in the Mission Portal. This group will be able to access the Mission Portal settings and configuration tools.
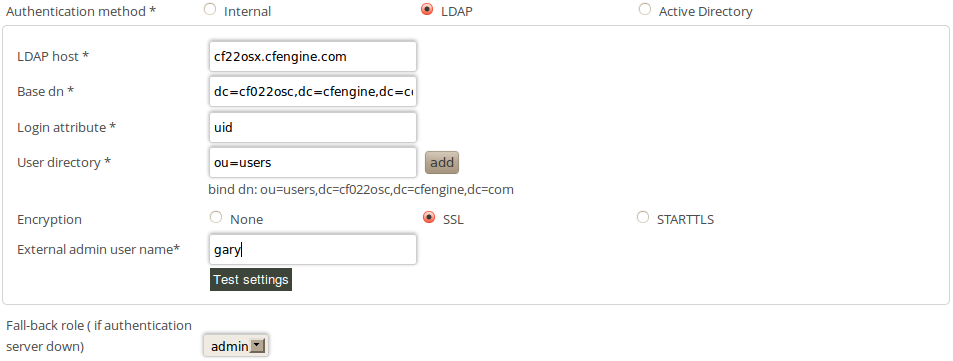
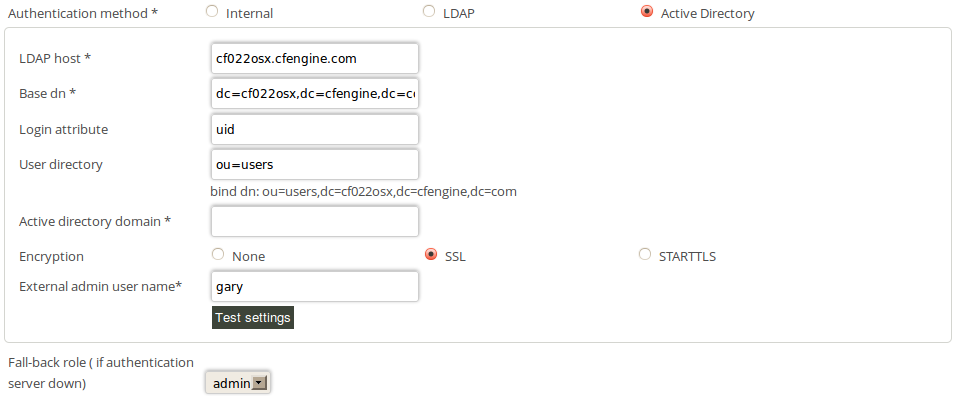
Authentication method
By default the Mission Portal will use the internal database to store user information. Default user name and password on the Mission Portal login page are "admin" and "admin".
External authentication (LDAP or Active Directory) is available for CFEngine 3 Nova 2.1 and later versions. See Configuration of external authentication for how to set this up.
Fall-back role
User group that will be able to access the Mission Portal through internal database authentication if external authentication is down or misconfigured.
Role-Based Access Control
CFEngine 3 Enterprise 2.2.0 introduces Role-Based Access Control (RBAC) for all hosts, reports and promises shown in the Mission Portal. RBAC does not cover access control for making policy changes. If you wish to use RBAC in combination with external authentication (LDAP or AD), we recommend that you wait to turn on RBAC until you log on with the LDAP or AD user that has been designated a Mission Portal admin (i.e do not turn RBAC on while logged in with an internal database user in this case). RBAC can be globally switched on or off, but see also Mission Portal User Admin for more details.
Show Business Room
Set whether the Business room should be visible or not on the Mission Portal main page. This is a global setting that affects all users.
Show Planning Room
Set whether the planning room should be visible or not on the Mission Portal main page. This is a global setting that affects all users.
Unreachable host threshold
Time after which a host is defined as unreachable (blue host; the hub is unable to reach this host due to connection problems). Default threshold is 15 minutes.
5.5.1.3 My Preferences
In My Preferences you can set Mission Portal tooltips on/off and the default number of rows to display in reports. If tooltip is on, a box containing a basic explanation will appear next to graphs and functions in the Mission Portal.
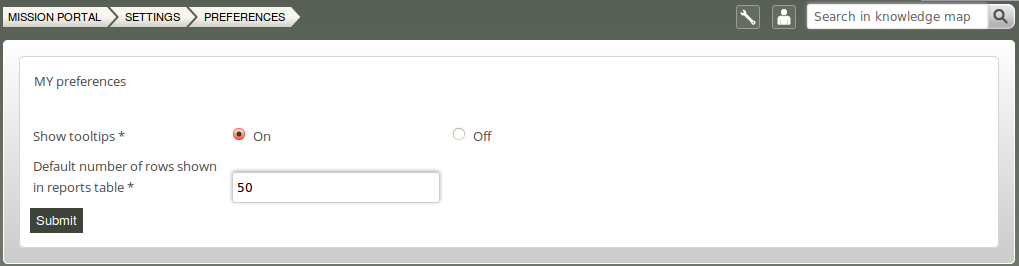
Figure: My preferences
5.5.1.4 Hub Replication Status
The Mission Portal has a role to play in Mission Criticality, as it is a single source of information, collected, categorized and calibrated for system engineers. Being a single source website, it is can also be regarded as a single point of failure from the point of view of a mission critical application.
The information in the mission portal is largely status information about systems. The content of the Mission Portal database is not in any way deterministic for the configured state of your IT system – it is only a report of actual state, not a template for intended state. If the Mission Portal is 'down' or unavailable, it does not in any way imply that the actual distributed system is down or that there is any fault.
If information and insight into your IT system are indeed Mission Critical for you, it is possible to create a high availability access to the mission information in the portal. CFEngine commercial editions support multiple 'hubs' for redundancy during reporting9. By making a cluster of three (or more) hubs, you can ensure that reports will always be available and up to date, at the time-resolution promised by CFEngine.
To set up redundant hubs, you will need three physical computers, or at least three virtual machines on different physical computers. The idea is to use the underlying technology of the MongoDB database to provide a replicated data store. If a single database server goes down a secondary replica can take over the role. The commercial editions of CFEngine interface with this database through cf-hub, and this process can be made aware of the underlying replica technology in the database. The architecture is intended to be as simple as possible for the CFEngine user to employ. The basic steps include:
- Install each of the three systems with the CFEngine 3 Enterprise extension package for policy hubs.
- The MongoDB backend needs to be set up specially before standard bootstrapping of nodes in an high availability managed network.
Alternatively, if you have already bootstrapped hosts, you can manually establish hub redundancy with a little database infrastructure work and some additional CFEngine configuration.
In general, we recommend a small amount of professional services to help set up such a system, as there are several details that need to be taken into account.
5.5.2 Mission Portal User Admin
CFEngine 3 Enterprise 2.2.0 introduces Role-Based Access Control (RBAC) to the Mission Portal. RBAC limits access to the Mission Portal settings page and access to hosts, reports and promises. It does not affect the ability to edit or approve policies in the policy editor (access control and authorization for policies are handled by subversion's authentication system, see Integration with subversion). RBAC can be globally switched on or off in the Mission Portal settings (see Mission Portal Settings).
On a fresh install the default user "admin" belongs to the "admin" user group and has access to both the User preferences and settings page and the User Administration page. The "admin" user can add users to the internal database and define user roles (Admin, Faculty, Developer, etc.) for users from either the internal database or an external authentication database (LDAP or Active Directory; see Mission Portal Settings and Configuration of external authentication).
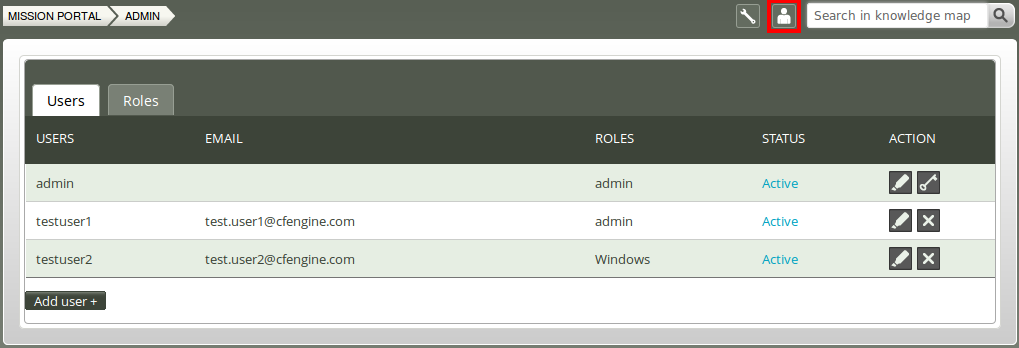
Figure: Mission Portal User Admin
Click the Add User button to add a new user to the internal database:
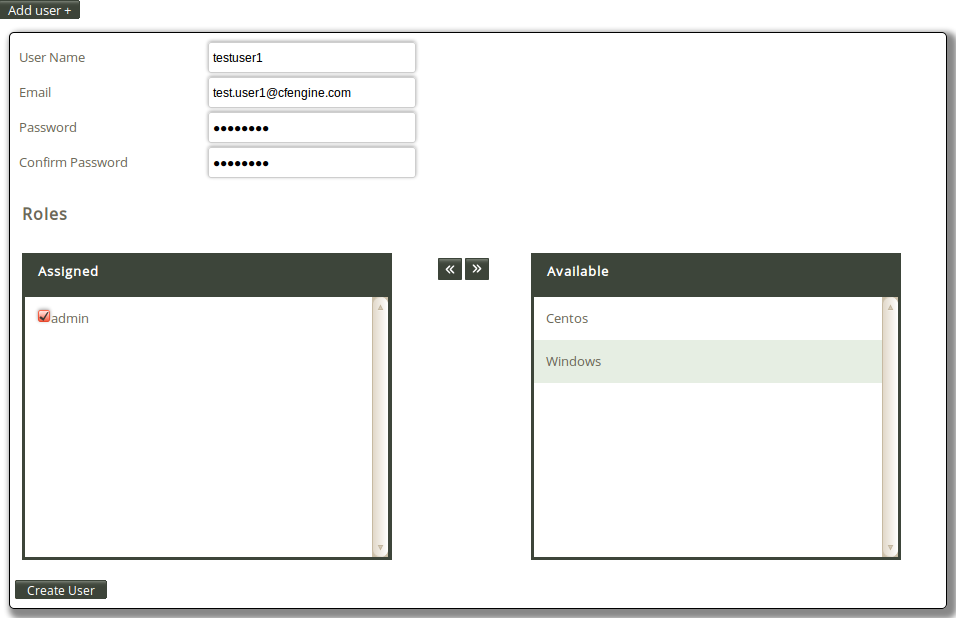
Figure: Add User
Enter the user information as requested in the fields. If user roles have been defined (see User Roles), you can also choose to assign one or more roles to the user by selecting an available group and clicking the << button located between the list of assigned and available roles. Finish by clicking Create User.
Users can be edited in the same way as above by clicking the Pencil button next to his or her user name.
5.5.2.1 User Roles
The information a user is authorized to see is determined from his or her
role memberships. A user may be member of an arbitrary number of
roles, each which may grant and deny access to certain
information. User-authentication is carried out when users log in to the Mission Portal.
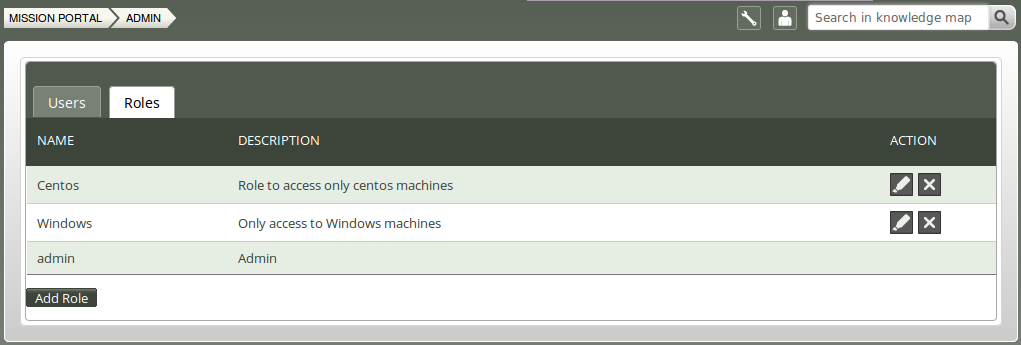
Figure: User Roles
Click the Add Role button to add a new user role to the Mission Portal:
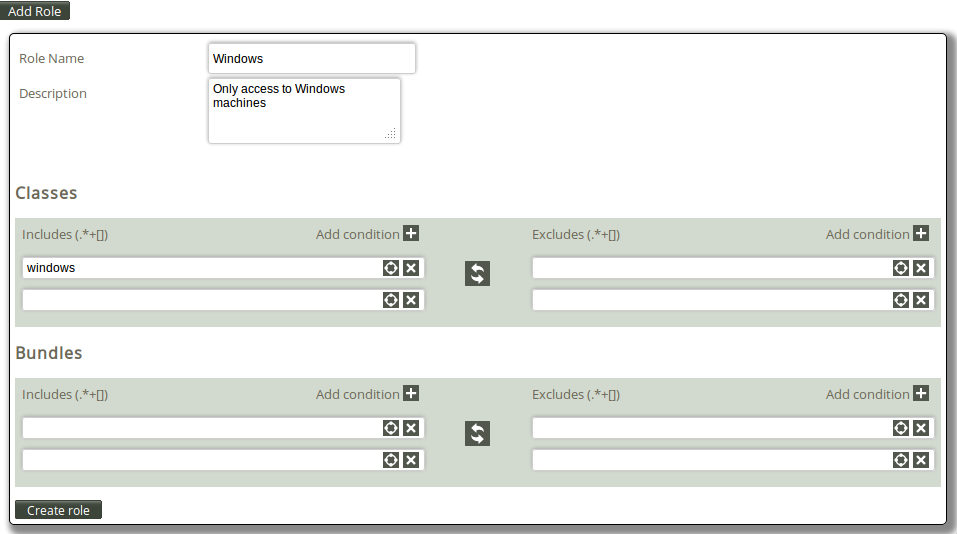
Figure: Add Role
Roles can be defined on either classes or bundles and involves setting permissions through an include and exclude list for each. The effective permissions of a user is the cumulative set of permission granted or denied by his roles, and is used to filter the information displayed in the following way:
- Create a union of the granted access for the roles.
- Override with the rules that deny access for the roles.
- If left unspecified, access is denied.
Entities filtered:
RBAC is supported on the host and promise bundle level,
each applying to different parts of the Mission Portal. Both these
entities are atomic with respect to RBAC — either a user can see
everything they contain, or nothing of it.
Access to a host is required to see any information about it, e.g. all
its reports (Status and Reports->Reports), host page, and compliance
category. If a user is not allowed access to a host, the Mission
Portal would look the same as if the host was not bootstrapped to that
hub.
Information about the running policy is also available in the Mission
Portal, either through the Promise Finder at the Status and Reports page, or
by clicking a promise handle from one of the reports. The searchable
promises in the Promise Finder and information pages about promises
and bundles are filtered in the same manner as the hosts, but defined
based on promise bundles instead. The Policy Editor is not covered by
RBAC — access to the policy source repository allows the user to see
the whole policy. Some version control systems can be configured to
only allow users to access sub-directories of the policy, which may
help in this case.
Note that the host and promise filtering is independent — no attempt
is made to try to infer which promises a role should have access to
based on the hosts it has access to or vice versa.
Defining roles:
From the above discussion, we see that a role is defined as reporting
access to a set of hosts and promise bundles from the Mission Portal
and REST API. This does not give any rights with respect to changing
the content or execution of the policy. It should not be confused with
the roles promise-type that can be used by cf-runagent
and cf-serverd.
In order to scale, both entities are
defined as a set of regular expressions to allow and
deny.
Access to hosts is defined by regular expressions on classes,
not the hostname, ip, or any other name. This is done to ensure
maximum scalability. Classes can be arbitrarily defined in the
CFEngine policy language, so this incurs no loss of flexibility, but
ensures distributed computation.
In contrast to users, a role definition and membership can only be
obtained from the internal Mission Portal database. This means that
any roles must be defined through the Mission Portal web interface,
and can not be obtained from e.g. LDAP at this time. The rationale is
that querying complex LDAP structures for role membership is too
inefficient and error-prone. This may change in future releases, if
requested. Note that the possible members of a role can be
obtained from other sources, as described in the section on user
administration. However, assigning possible members to roles must be
done through the Mission Portal user-interface.
Limitations:
- Notes added in the Mission Portal are not filtered: they can be
seen by all users (including notes added to any host page).
- The Knowledge Map is only available for members of the
‘admin’ role when RBAC is switched on.
- Running
cf-report from the command-line on the hub will
bypass all RBAC checks.
6 Monitoring extensions
CFEngine 3 Enterprise incorporates a lightweight monitoring agent, whose aim
is to provide meaningful performance data about systems, in a scalable
fashion. CFEngine 3 Enterprise does not aim to replace specialized
rapid-update monitoring and alarm systems; it provides a context-aware
summary of current state that is always displayed in relation to
previous system behavior, for comparison. The aim is to offer useful
analytics rather than jump-to alarms.
CFEngine's monitoring component cf-monitord records a number of
performance data about the system by default. These include process
counts, service traffic, load average and CPU utilization and
temperature when available. In the Community Edition, data are
only collected and stored for personal use, but users have to work to see
results. CFEngine 3 Enterprise improves on this in three ways.
- Data collected from the monitoring system are integrated into
the aggregate knowledge console.
- It adds a three year life-cycle trend summary, based on
`shift'-averages.
- It adds customizable promises to monitor or
log specific highly specific user data through the generic promise
interface.
The end result is to display time series traces of system performance, like the
above mentioned values, and customized logs feeding custom-defined
reports.
6.1 Integration of monitoring with knowledge base
CFEngine 3 Enterprise integrates monitoring reports with the automated base
knowledge to provide self-analysis and simple summary reporting;
the Mission Portal shows important status summaries and allow users to drill down to specific reporting data.
Detailed time-series views can be collected and collated, providing
honest and accurate data that allow you to gauge your own confidence
level in system performance. Unlike most monitoring solutions,
CFEngine shows you its own confidence in the measurements taken. It
takes a finite amount of time to measure and transport data from
systems to the knowledge console. That time also provides information
about system performance. CFEngine always promises to tell you how old
data are and how confident it is in the values.
6.2 Long term trends
CFEngine normally operates with time-series data represented
in two forms:
- A weekly average, plotted on a periodogram, showing performance now in relation
to the same time of week in previous weeks. After about a month data are forgotten
to ensure a sufficient rate of adaptation to new patterns.
- The past four hours in high resolution.
CFEngine 3 Enterprise adds quarter day averages of recorded time-series which go back three
years in time. Three years is considered to be the lifetime of a computer.
Summaries of the detailed performance are summarized by flat averages for
a four-shift day:
- Night shift: from midnight 00:00 to 06:00
- Morning shift: from 06:00 to 12:00
- Afternoon shift: from 12:00 to 18:00
- Evening shift: from 18:00 to 00:00
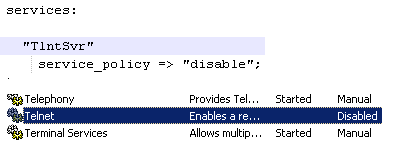
6.3 Custom promises to measure
CFEngine 3 Enterprise adds a new promise type in bundles for the monitoring
agent. These are written just like all other promises within a bundle
destined for the agent concerned. In this case:
bundle monitor watch

{
measurements:

  # promises ...

}
6.3.1 Extraction strings and logging
Let's take a generic example. Suppose we have a file of nonsense /tmp/testmeasure
and we want to extract some information that we call a `blonk'
from the file. A blonk is always on the second line of this file following
a prefix `Blonk blonk '. We would get the value like this:
  "/tmp/testmeasure"

      handle => "blonk_watch",
      stream_type => "file",
      data_type => "string",
      history_type => "log",
      units => "blonks",
      match_value => find_blonks,
      action => sample_min("10");
This promise body has several attributes.
handle- It is essential to give measurement promises handles, as these are used to label the
log files that will store the values.
stream_type- Tells us that we are reading from what the system considered to be a regular file
on the file-system.
data_type- This says that data are to be treated as text with no other meaning.
history_type- This tells us that we want to log the values with a time stamp.
units- This string is used in documentation to explain the measurement units of this result.
match_value- This is a body reference that represents the algorithm by which we extract data from the file.
action- This is the generic action parameter that may be added to all promises. We use it
here to limit the sample rate of this promise;
cf-monitord samples by default
at a rate of once per 2.5 minutes.
The matching body uses a method for selecting the correct line, and a way
for extracting a pattern from the line. In every case the value extracted
is described by using a regular expression back-reference, i.e.
a parenthesized expression within a regular expression. The expression should
match the entire line and should contain exactly one parenthesis.
body match_value find_blonks
{
select_line_number => "2";
extraction_regex => "Blonk blonk ([blonk]+).*";
}
The sampling rate is controlled by using the generic action constraint.
body action sample_min(x)
{
ifelapsed => "$(x)";
expireafter => "$(x)";
}
6.3.2 Extracting one-off numerical data
In this example we extract an integer value from an existing file.
Notice that CFEngine samples the process table during processes
promises so you might be able to save a new execution of a
shell command and use the cached data, depending on your need
for immediacy. It is always good practice to limit the system
load incurred by monitoring.
  # Test 2 - follow a special process over time
  # using CFEngine's process cache to avoid re-sampling

   "/var/cfengine/state/cf_rootprocs"

      handle => "monitor_self_watch",
      stream_type => "file",
      data_type => "int",
      history_type => "static",
      units => "kB",
      match_value => proc_value(".*cf-monitord.*",

         "root\s+[0-9.]+\s+[0-9.]+\s+[0-9.]+\s+[0-9.]+\s+([0-9]+).*");
This match body selects a line matching a particular regular expression
and extracts the 6th column of the process table. The regular expression
skips first the root string and then five numerical values.
The value is extracted into a one-off value
body match_value proc_value(x,y)
{
select_line_matching => "$(x)";
extraction_regex => "$(y)";
}
6.3.3 Extraction to list variable
In this example we discover a list of disks attached to the system.
  # Test 3, discover disk device information

  "/bin/df"

      stream_type => "pipe",
      data_type => "slist",
      history_type => "static",
      units => "device",
      match_value => file_system,
      action => sample_min("480"); # this is not changing much!
body match_value file_system
{
select_line_matching => "/.*";
extraction_regex => "(.*)";
}
6.4 Uses for custom monitoring
Unlike most other monitoring tools that use heavy-weight scripting
languages to extract data, often running many processes for each
measurement, CFEngine is a lightweight probe, using file interfaces
and regular expressions. Thus its impact on the
system is minimal. The possibilities for using this are therefore
extremely broad:
- Extracting accounting data from systems for charge-back.
This could be useful in cloud scenarios.
- Discovering memory leaks.
- Looking for zombie processes relating to specific software.
- Logging up-time.
- System class-dependent discovery and extraction of any kind of text
for insertion into a CMDB.
7 File Access Control Lists
7.1 ACL Introduction
Access Control Lists (ACL) allow for a more fine-grained access control on
file system objects than standard Unix permissions. In spite of the success
of the POSIX model's simplicity the functionality is limited.
File permission security is a subtle topic. Users should take care
when experimenting with ACLs as the results can often be
counter-intuitive. In some cases the functioning of a system can be
compromised by changes of access rights.
Not all file systems support ACLs. In Unix systems there is a plethora
of different file system types, which have different models of ACLs.
Be aware that the mount-options for a file-system may affect the ACL
semantics.
|
Note that when adding a user to a group, this will not have any
effect until the next time the user logs in on many operating
systems.
|
As CFEngine works across multiple platforms and needs to support ACLs
with different APIs, a common ACL syntax has been abstracted to add a
layer of portability. This is a specific feature of CFEngine, not of
the host systems. A generic syntax ensures that the ACLs that are
commonly needed can be coded in a portable fashion. CFEngine 3 Enterprise's
ACL model is translated into native permissions for implementation;
CFEngine does not interfere with native access mechanisms in any way.
The CFEngine ACL syntax is similar to the POSIX ACL syntax, which is
supported by BSD, Linux, HP-UX and Solaris.
CFEngine also allows you to specify platform-dependent ACLs. Of
course, these ACLs will only work on the given platform, and must
therefore be shielded with classes that select the appropriate model
within the promise body.
Currently, CFEngine 3 Enterprise supports the following ACL APIs and operating
systems.
| ACL type | Operating system
|
|---|
| NTFS | Windows Server 2003, 2008
|
| POSIX | Linux
|
7.2 File ACL example
The form of a CFEngine files promise that uses ACLs is as follows:
#
# test_acl.cf
#

body common control
{
bundlesequence => { "acls" };
}

#########################################

bundle agent acls

{
files:

  "/office/shared"

    acl => template;
}

#########################################

body acl template

{
acl_method => "overwrite";
acl_directory_inherit => "parent";

 linux|solaris::

  acl_type => "posix";

  aces => {
          "user:*:rw",
          "user:root:rw",
          "group:*:r",
          "mask:rwx",
          "all:r"
          };

 windows::

  acl_type => "ntfs";

  aces => {
          "user:Administrator:rw(po)",
          "all:r"
          };
}
7.2.1 Concepts
As mentioned, there are many different ACL APIs. For example, the
POSIX draft standard, NTFS and NFSv4 have different and incompatible
ACL APIs. As CFEngine is cross-platform, these differences should, for
the most usual cases, be transparent to the user. However, some
distinctions are impossible to make transparent, and thus the user
needs to know about them.
We will explore the different concepts of ACL implementations that are
critical to understanding how permissions are defined and enforced in
the different file systems. As a running example, we will consider
NTFS ACLs and POSIX ACLs, because the distinction between these ACL
APIs is strong.
7.2.2 Entity types
All ACL APIs support three basic entity types: user, group and
all. User and group are simply users and groups of the system, where a
group may contain multiple users. all is all users of the system, this
type is called "other" in POSIX and "Everyone" in NTFS.
7.2.3 Owners
All file system objects have an owner, which by default is the entity
that created the object. The owner can always be a user. However, in
some file systems, groups can also be owners (e.g. the
"Administrators" group in NTFS). In some ACL APIs (e.g POSIX),
permissions can be set explicitly for the owner, i.e. the owner has an
independent ACL entry.
7.2.4 Changing owner
It is generally not possible for user A to set user B as the
owner of a file system object, even if A owns the object. The
superuser ("root" in POSIX, "Administrator" in NTFS) can however
always set itself as the owner of an object. In POSIX, the superuser
may in fact set any user as the owner, but it NTFS it can only take
ownership.
7.2.5 Permissions
An entity can be given a set of permissions on a file system object
(e.g. read and write). The data structure holding the permissions for
one entity is called an "Access Control Entry" (ACE). As many users
and groups may have sets of permissions on a given object, multiple
Access Control Entries are combined to an Access Control List, which
is associated with the object.
The set of available permissions differ with ACL APIs. For example,
the "Take Ownership" permission in NTFS has no equivalent in
POSIX. However, for the most common situations, it is possible to get
equivalent security properties by mapping a set of permissions in one
API to another set in a second API.
There are however different rules for the access to the contents of a
directory with no access. In POSIX, no sub-objects of a directory with
no access can be accessed. However, in NTFS, sub-objects that the entity
has access rights to can be accessed, regardless of whether the entity
has access rights to the containing directory.
7.2.6 Deny permissions
If no permissions are given to a particular entity, the entity will be
denied any access to the object. But in some file systems, like NTFS,
it is also possible to explicitly deny specific permissions to
entities. Thus, two types of permissions exist in these systems: allow
and deny.
It is generally good practice to design the ACLs to specify who is
allowed to do some operations, in contrary to who is not allowed to do
some operations, if possible. The reason for this is that describing
who is not allowed to do things tend to lead to more complex
rules and could therefore more easily lead to mis-configurations and
security holes. A good rule is to only define that users should not be
able to access a resource in the following two scenarios:
- Denying access to a subset of a group which is allowed access
- Denying a specific permission when a user or a group has full access
If you think about it, this is the same principle that applies to
firewall configuration: it is easier to white-list, specify who should
have access, than to blacklist, specify who should not have access. In
addition, since CFEngine is designed to be cross-platform and some ACL
permissions are not available on all platforms, we should strive to
keep the ACLs as simple as possible. This helps us avoid surprises
when the ACLs are enforced by different platforms.
7.2.7 Changing permissions
Generally, only the owner may change permissions on a file system
object. However, superusers can also indirectly change permissions by
taking ownership first. In POSIX, superusers can change permissions
without taking ownership. In NTFS, either ownership or a special
permission ("Change Permissions") is needed to alter permissions.
7.2.8 Effective permissions
Unfortunately, even though two ACL APIs support all the permissions
listed in an ACL, the ACL may be interpreted differently. For a given
entity and object with ACL, there are two conceptually different ways
to interpret which permissions the entity obtains: ACE precedence and
cumulative ACL.
For example, let ‘alice’ be a user of the group
‘staff’. There is an ACL on the file schedule, giving
‘alice’ write permission, and the group ‘staff’ read
permission. We will consider two ways to determine the effective
permissions of ‘alice’ to schedule.
Firstly, by taking the most precise match in the ACL, ‘alice’ will be
granted write permission only. This is because an ACE describing ‘alice’
is more precise than an ACE describing a group ‘alice’ is member
of. However, note that some ACEs may have the same precedence, like
two ACEs describing permissions for groups ‘alice’ is member of. Then,
cumulative matching will be done on these ACEs (explained next). This
is how POSIX does it.
Secondly, we can take the cumulative permissions, which yields a user
permissions from all the ACE entries with his user name, groups he is
member of or the ACE entry specifying all users. In this case,
‘alice’ would get read and write on schedule. NTFS
computes the effective permissions in this way.
7.2.9 Inheritance
Directories have ACLs associated with them, but they also have the
ability to inherit an ACL to sub-objects created within them. POSIX
calls the former ACL type "access ACL" and the latter "default ACL",
and we will use the same terminology.
7.3 CFEngine 3 Generic ACL Syntax
The CFEngine 3 ACL syntax is divided into two main parts, a generic
and an API specific (native). The generic syntax can be used on any
file system for which CFEngine supports ACLs, while the native syntax
gives access to all the permissions available under a particular ACL
API.
An ACL can contain both generic and native syntax. However, if it
contains native syntax, it can only be enforced on systems supporting
the given ACL API. Thus, only the generic syntax is portable.
Note that even though the same generic ACL is set on two systems with
different ACL APIs, it may be enforced differently because the ACE
matching algorithms differ. For instance, as discussed earlier, NTFS
uses cumulative matching, while POSIX uses precedence
matching. CFEngine cannot alter the matching algorithms, and
simulating one or the other by changing ACL definitions is not
possible in all cases, and would probably lead to confusion. Thus, if
an ACL is to be used on two systems with different ACL APIs, the user
is encouraged to check that any differences in matching algorithms do
not lead to mis-configurations.
The CFEngine generic ACL syntax explained next, and native syntax is
described in following sections.
     body acl acl_alias:
     {
     acl_type              => "generic"/"ntfs"/"posix";
     acl_method            => "append"/"overwrite";
     acl_directory_inherit => "nochange"/"clear"/"parent"/"specify";
     aces                  => {
                               "user:uid:mode[:perm_type]", ...,
                               "group:gid:mode[:perm_type]", ...,
                               "all:mode[:perm_type]"
                              };
     specify_inherit_aces  => {
                               "user:uid:mode[:perm_type]", ...,
                               "group:gid:mode[:perm_type]", ...,
                               "all:mode[:perm_type]"
                              };
     }
|
acl_alias is the name of the specified ACL. It can be any
identifier containing alphanumeric characters and underscores. We
will use this name when referring to the ACL.
acl_type (optional) specifies the ACL API used to
describe the ACL. It defaults to generic, which allows only
CFEngine generic ACL syntax, but is valid on all supported
systems. acl_type only needs to be specified if native
permissions are being used in the ACL (see nperms below). If
acl_type is set to anything other than generic, the
system on which it is enforced must support this ACL API.
acl_method (optional) can be set to either
append or overwrite, and defaults to
append. Setting it to append only adds or modifies the
ACEs that are specified in aces (and
specify_inherit_aces, see below). If set to
overwrite, the specified ACL will completely replace the
currently set ACL. All required fields must then be set in the
specified ACL (e.g. all in POSIX), see the following sections
describing the supported native APIs.
acl_directory_inherit (optional) specifies the ACL of
newly created sub-objects. Only valid if the ACL is set on a
directory. On directories, nochange is the default and
indicates that the ACL that is currently given to newly created child
objects is left unchanged. If set to clear, no ACL will be
inherited, but the file system specifies a default ACL, which varies
with the file system (see the following sections on the supported ACL
APIs). parent indicates that the ACL set in aces (see
below) should be inherited to sub-objects. If set to specify,
specify_inherit_aces specifies the inherited ACL, and
acl_method applies for specify_inherit_aces too.
aces is a list of access control entries. It is parsed
from left to right, and multiple entries with the same entity-type
and id is allowed. This is necessary to specify permissions with
different perm_type for the same entity (e.g. to allow read
permission but explicitly deny write).
specify_inherit_aces (optional) is a list of access control
entries that are set on child objects. It is also parsed from left
to right and allows multiple entries with same entity-type and
id. Only valid if acl_directory_inherit is set to
specify.
user indicates that the line applies to a user specified
by the user identifier uid. mode is the permission
mode string.
group indicates that the line applies to a group specified
by the group identifier gid. mode is the permission
mode string.
all indicates that the line applies to every
user. mode is the permission mode string.
uid is a valid user name for the system and
cannot be empty. However, if acl_type is posix,
uid can be set to * to indicate the user that owns the file
system object.
gid is a valid group name for the system and
cannot be empty. However, if acl_type is posix,
gid can be set to * to indicate the file group.
mode is one or more strings
op|gperms|(nperms); a concatenation of op,
gperms and optionally (nperms), see below, separated
with commas (e.g. +rx,-w(s)). mode is parsed from left to
right.
op specifies the operation on any existing permissions,
if the specified ACE already exists. op can be =, empty, + or
-. = or empty sets the permissions to the ACE as stated, + adds and
- removes the permissions from any existing ACE.
nperms (optional) specifies ACL API specific
(native) permissions. Only valid if acl_type is not
generic. Valid values for nperms varies with different
ACL types, and are specified in subsequent sections.
perm_type (optional) can be set to either allow or
deny, and defaults to allow. deny is only valid
if acl_type is set to an ACL type that support deny
permissions.
gperms (generic permissions) is a concatenation of zero
or more of the characters shown in the table below. If left empty,
none of the permissions are set.
| Flag | Description | Semantics on file | Semantics on directory
|
|---|
r | Read | Read data, permissions, attributes | Read
directory contents, permissions, attributes
|
w | Write | Write data | Create, delete, rename sub-objects
|
x | Execute | Execute file | Access sub-objects
|
Note that the r permission is not necessary to read an object's
permissions and attributes in all file systems (e.g. in POSIX, having
x on its containing directory is sufficient).
7.3.1 Generic syntax examples
body common control
{
bundlesequence => { "acls" };
}

bundle agent acls
{
files:
  "/office/schedule"
    acl => small;

  "/office/audit_dir"
    acl => dirinherit;
}

body acl small
{
aces => {"user:alice:w", "group:staff:r", "all:"};
}

body acl dirinherit
{
acl_directory_inherit => "parent";
aces => {"user:alice:+w,-x", "user:bob:+r,-w", "group:staff:=rx", "all:-w"};
}
See the following sections on native ACL types for more examples.
7.4 POSIX ACL type
7.4.1 POSIX-specific ACL syntax
Native permissions
The valid values for nperms in POSIX are r,w, and
x. These are in fact the same as the generic permissions, so
specifying them as generic or native gives the same effect.
File owner and group
A user-ACE with uid set to * indicates file object owner. A group-ACE
with gid set to * indicates file group.
mask mask can be specified as a normal ACE, as
mask:mode. mask specifies the maximum permissions that are
granted to named users (not owning user), file group and named
groups. mask is optional, if it is left unspecified it will will be
computed as the union of the permissions granted to named users, file
group and named groups (see acl_calc_mask(3)).
Required ACEs POSIX requires existence of an ACE for the file
owner, (user:*:mode), the file group (group:*:mode),
other (all:mode) and mask (mask:mode). As mentioned,
CFEngine automatically creates a mask-ACE, if missing. However, if
method is set to overwrite, the user must ensure that
the rest of the required entries are specified.
7.4.2 Generic syntax mapping
Entity types
All entity types in the generic syntax are mapped to the corresponding
entity types with the same name in POSIX, except all which
corresponds to other in POSIX.
Generic permissions
As shown in the table below, gperms is mapped straightforward
from generic to POSIX permission flags.
| Generic flag | POSIX flag
|
|---|
r | r
|
w | w
|
x | x
|
Inheritance POSIX supports acl_directory_inherit set to
specify. The specify_inherit_aces list is then set as the
default ACL in POSIX (see acl(5)).
If acl_directory_inherit is set to parent, CFEngine
copies the access ACL to the default ACL. Thus, newly created objects
get the same access ACL as the containing directory.
acl_directory_inherit set to clear corresponds to no
POSIX default ACL. This results in that newly created objects get ACEs
for owning user, group and other. The permissions are set in
accordance with the mode parameter to the creating function and the
umask (usually results in 644 for files and 755 for directories).
Further reading The manual page acl(5) contains much
information on POSIX ACLs, including the access check algorithm. In
particular, this shows that POSIX uses ACE precedence matching, and
exactly how it is done. Operating systems usually bundle tools for
manipulating ACLs, for example getfacl(1) and
setfacl(1).
7.4.3 POSIX ACL examples
body common control
{
bundlesequence => { "acls" };
}

bundle agent acls
{
files:

  "/office/timetable"
    acl => nativeperms;

  "/office/user_dir"
    acl => specifyinherit;
}

body acl nativeperms
{
acl_type => "posix";
aces => {"user:alice:r(w)", "user:root:=(rwx)",
         "group:staff:-r(x)", "all:-(w)", "mask:(rx)"};
}

body acl specifyinherit
{
acl_type => "posix";
acl_method => "overwrite";
acl_directory_inherit => "specify";
aces => {"user:*:rwx", "group:*:rx", "user:alice:rwx",
         "user:root:rx", "group:staff:r", "all:rx"};
specify_inherit_aces => {"user:*:", "group:*:", "all:"};
}
7.5 NT ACL type
7.5.1 NT-specific ACL syntax
Native permissions
NTFS supports fourteen so-called special file permissions. However, we
do not consider the Synchronize permission because it is used
for a different purpose than the other permissions. In order to give
access to the thirteen relevant permissions, CFEngine defines a native
permission flag for each of them. This one-to-one mapping is as
follows.
| NTFS Special Permission | CFEngine nperm
|
|---|
| Execute File / Traverse Folder | x
|
| Read Data / List Folder | r
|
| Read Attributes | t
|
| Read Extended Attributes | T
|
| Write Data / Create Files | w
|
| Append Data / Create Folders | a
|
| Write Attributes | b
|
| Write Extended Attributes | B
|
| Delete Sub-folders and Files | D
|
| Delete | d
|
| Read Permissions | p
|
| Change Permissions | c
|
| Take Ownership | o
|
The semantics of these special permissions can be found in the
references for further reading below.
Denying permissions
NTFS supports setting perm_type to deny in addition to
allow, which is the default. This can for instance be used to
denying a user a particular permission that a group membership grants
him. It is important to note that the precedence of allow and deny
permissions is as follows:
- Explicit Deny
- Explicit Allow
- Inherited Deny from parent
- Inherited Allow from parent
- Inherited Deny from grandparent
- Inherited Allow from grandparent
- ...
Thus, the closer the permission is to the object in the directory
path, the greater precedence it is given.
An important point here is that even though a user is denied access in
a parent directory and this permission is inherited, but one of the
groups he is member of is explicitly allowed access to a file in that
directory, he is actually allowed to access the file.
Ownership
In NTFS, the default owner is the user who is currently logged on. The
only exceptions occur when the user is a member of either the
‘Administrators’ group or the ‘Domain Admins’ group.
Owners of NTFS objects can allow another user to take ownership by
giving that user Take Ownership permission. Owners can also give other
users the Change Permissions flag. In addition, members of the
‘Administrator’ group can always take ownership. It is never
possible to give ownership of an object to a user, but members of
the ‘Administrator’ group can give ownership to that group.
7.5.2 Generic syntax mapping
Entity types
The three entity types of NTFS are called user, group and
Everyone. The user and group entity types in NTFS are mapped to the
user and group entity types in CFEngine. Everyone is mapped to all in
CFEngine.
Generic permissions
For NTFS, CFEngine maps the gperms to nperms as
follows.
| Generic flag | Native flags
|
|---|
r | rtTp
|
w | wabB
|
x | x
|
The rationale for this mapping is discussed next.
NTFS groups the thirteen special permissions to create five sets of
permissions:
- Read
- Read & Execute
- Write
- Modify
- Full Control
In addition, we have the List Folder Contents set, which is equivalent
to the Read & Execute set but is only available to- and inherited by
directories. The Full Control set is unsurprisingly all the thirteen
special permissions. An overview of the NTFS mapping of special
permissions to sets is given in the references stated as further
reading below. The NTFS permission sets can be expressed in CFEngine
syntax as follows.
| NTFS sets | CFEngine gperms|(nperms)
|
|---|
Read | r
|
Write | w
|
Read & Execute | rx
|
Modify | rwx(d)
|
Full Control | rwx(dDco)
|
Inheritance
acl_directory_inherit set to clear disables
inheritance, such that child objects get a default ACL specified by
the operating system, namely Full control for the file object creator and
SYSTEM accounts.
POSIX compatibility
Be aware that setting gperms to ‘rwx’ on directories is
more restrictive in NTFS than in POSIX ACLs. This is because NTFS does
not allow deletion of objects within a directory without a Delete
Sub-folders and Files permission on the directory (or a Delete
permission on the object itself), while in POSIX, ‘rwx’ on the
directory is sufficient to delete any file or directory within it
(except when the sticky-flag is set on the directory). Thus, on
directories, the NTFS-equivalent to POSIX gperms set to
‘rwx’ is ‘rwx(D)’. However, for files, ‘rwx’ is
equivalent in POSIX and NTFS semantics.
In POSIX ACLs, there is no explicit delete permission, but the
execute, write and sticky permissions on the containing directory
determines if a user has privileges to delete. In POSIX, the owner and
root can change permissions, while usually only the root may change
the ownership, so there is no direct equivalent to the Change
Permission and Take Ownership in POSIX.
Further reading
A description of the fourteen NTFS permission and the mapping of these
into sets is given at http://support.microsoft.com/kb/308419.
7.5.3 NT ACL examples
body common control
{
bundlesequence => { "acls" };
}

bundle agent acls
{
files:

  "C:\Program Files\Secret Program"
    acl => restrictive;

  "D:\Shared"
    acl => sharespace;
}

body acl restrictive
{
acl_type => "ntfs";
acl_method => "overwrite";
acl_directory_inherit => "parent";
aces => {"user:Administrator:r"};
}

body acl sharespace
{
acl_type => "ntfs";
acl_method => "overwrite";
acl_directory_inherit => "specify";
aces => { "user:Administrator:rwx(dDco)",
          "group:Hackers:rwx(dDco):deny",
          "all:rw" };
specify_inherit_aces => {"user:Administrator:r"};
}
8 Server extensions
CFEngine 3 Enterprise adds a simple server extension to the Community Edition
server, namely the ability to encode data directly in policy.
This feature is useful for distributing password hashes
to systems.
8.1 Server access resource type
By default, access to resources granted by the server are
files. However, sometimes it is useful to cache literal
strings, hints and data in the server, e.g. the contents of variables,
hashed passwords etc for easy access. In the case of literal data, the
promise handle serves as the reference identifier for queries. Queries
are instigated by function calls by any agent.
access:

  "This is a string with a $(localvar) for remote collection"

        handle  => "test_scalar",
  resource_type => "literal",
        admit   => { "127.0.0.1" };
The promise looks exactly like a promise for a file object, but the data
are literal and entered into the policy. This is a useful approach for
distributing password hashes on a need-to-know basis from a central location.
The server configuration file need not be distributed to any client, thus
only authorized systems will have access to the hashes.
8.2 Function remotescalar
The client side of the literal look up function is:
(string) remotescalar(resource handle,host/IP address,encrypt);
|
This function downloads a string from a remote server, using the promise handle
as a variable identifier.
ARGUMENTS:
- ‘resource handle’
- The name of the promise on the server side
- ‘host or IP address’
- The location of the server on which the resource resides.
- ‘encrypt’
- Whether to encrypt the connection to the server.
               true
               yes
               false
               no
8.3 Example remote scalar lookup
########################################################
#
# Remote value from server connection to cf-serverd
#
########################################################

body common control

{
bundlesequence  => { "testbundle"  };

version => "1.2.3";
}

########################################################

bundle agent testbundle

{
vars:

 "remote" string => remotescalar("test_scalar","127.0.0.1","yes");

reports:

  linux::

    "Receive value $(remote)";
}

#########################################################
# Server config
#########################################################

body server control

{
allowconnects         => { "127.0.0.1" , "::1" };
allowallconnects      => { "127.0.0.1" , "::1" };
trustkeysfrom         => { "127.0.0.1" , "::1" };
allowusers            => { "mark" };
}

#########################################################

bundle server access_rules()

{
vars:

  "localvar" string => "literal string";

access:

  "This is a $(localvar) for remote access"

        handle  => "test_scalar",
  resource_type => "literal",
        admit   => { "127.0.0.1" };
}
9 Environments and workflows
9.1 Environments in CFEngine 3 Enterprise
CFEngine 3 Enterprise supports notion of `environments' – named groups of hosts, like
`development', 'QA' and 'production' hosts.
Each environment gets
- Separate subdirectory `environment_<NAME>' for storing promises
- Separate subdirectory `environment_<NAME>/cdp_inputs' for content-based policies
- grouping of hosts belonging to environment in GUI
Default CFEngine 3 Enterprise policies group hosts into environments in bundle `common
environments'. This bundle defines
- `environments.active' variable. This variable holds the name of environment for current host, and is used by other promises in CFEngine 3 Enterprise templates. This variable does not affect grouping in GUI.
- global `environment_<NAME>' class. This class should be defined if given host belongs to the `<NAME>' environment. GUI groups hosts using this class.
Administrator may customize this bundle as needed, adding or removing
environments defined (CFEngine 3 Enterprise does not have any built-in environment
names), changing rules for hosts selection and making any other
modifications, the only requirement for environments feature to work
is keeping aforementioned variables and classes defined. Note that the
environment name 'any' is reserved.
Default rules expect file `environment_$(promises.active)/promises.cf'
to exist and to contain bundle `agent main', this bundle is included
last from main promises.cf and should implement/include/use any
environment-specific rules.
9.2 Implementing workflows in CFEngine 3 Enterprise
Workflows are implemented easily with CFEngine 3 Enterprise, administrator starts with
defining necessary set of environments (usually those are
`development', `testing' and 'production'), then develops new
configuration in one enviroment, and promotes rules first to testing
and then to production environment.
Promotion of rules is performed by copying rules from one
environment's subdirectory to next one.
10 Virtualization
10.1 What are virtualization and cloud computing?
Virtualization refers to the ability to run multiple host instances on
a single physical node. Cloud computing typically refers to what is
called `platform as a service', or deployment of virtual machines on
demand, often as an on-line service.
In this document, virtualization support refers specifically to
hypervisor technologies supported by the open source library layer libvirt
project, which includes interfaces for Xen, KVM, Vmware-ESX, and more.
CFEngine thus integrates freely with other tools based on this library, such
as virsh and the Virtual Manager graphical user interface.
10.2 Why build virtualization support into CFEngine?
Virtualization engines (usually called supervisors or hypervisors) are
seeing an explosion of development. They exist as a number of projects
in various stages of maturity. The libvirt project was designed as
an integration layer based on an XML specification.
The tools for management are still quite primitive and require much
manual work. CFEngine has a unique role to play in maintaining desired
state in virtual machine systems.
In the cloud, virtual machines may be rented from remote commercial
providers, and managed as disposable resources. Convergent or
`self-healing' maintenance is an essential method for managing
machines that are geographically remote and awkward to access, e.g.
machines in other time-zones that it is impractical to monitor by
legacy methods.
10.3 What can CFEngine do with virtual machines?
The simple answer is: most things that libvirt can do, with added
convergence to a desired state: that means, creating, destroying and
starting and stopping machines. By starting virtual machines through
CFEngine, you can be sure that a given `virtual guest' is running on
one and only one physical host, thus avoiding conflicts that are
difficult to detect with centralized systems.
CFEngine does not support everything that libvirt does – it offers a
simplified interface that is meant for robustness, stability and
hands-free repeatability.
|
CFEngine does not use libvirt's TLS based web communication layer. It
manages every host as an independent entity, in typical CFEngine
fashion, using CFEngine's own distributed cooperation to provide the
implicit communication. CFEngine does not currently support so-called
`live migration' of virtual machines.
|
10.4 Guest environments promises
A virtual machine is one example of what CFEngine calls an `guest
environment'. You can promise to create (and host) an guest
environment with certain attributes, just as you can promise to host a
file or a process. Here is a simple example:
body common control
{
bundlesequence  => { "my_vm_cloud" };
}

#######################################################

bundle agent my_vm_cloud
{
guest_environments:

   "myUbuntu" # the running instance name, defined in XML

       environment_resources => virt_xml,
       environment_type      => "xen",
       environment_host      => "my_physical_computer", # ipv4_10_1_2_3
       environment_state     => "create";
}

#######################################################

body environment_resources virt_xml
{
env_spec_file => "/srv/xen/centos5-libvirt-create.xml";
}
- The promiser (in this case ‘myUbuntu’) is the name of the virtual
machine. This should be a unique identifier, as we need to be able to
refer to machines uniquely.
- The guest environment host is the name of the computer that
is the host for the virtual machine.
- Normally when we want to ensure something on a machine, we use classes
to decide where the promise will be made. For guest environments, however,
we need to make promises about the uniqueness of the machine. When you
make a machine instance you normally want it to be running on one and
only one host. So you want every machine to make a promise. On the
guest environment's host, you want to promise that the guest environment is
running, and on every other machine you want to promise that it is
not. In CFEngine, you simply include a unique class belonging to host
in the promise using
environment_host and CFEngine assumes that
rest. Unique classes might include
- Hostname class e.g.
myhost_CFEngine_com
- IP address class e.g.
ipv4_123_456_789_123
An alternative way to write this example is to quote the XML
specification in CFEngine directly. This has a few advantages: you can
re-use the data and use it as a template, filling in
CFEngine-variables. You can thus adapt the configuration using
CFEngine's classes.
bundle agent my_vm_cloud
{
guest_environments:

   "myUbuntu" # the running instance name, defined in XML
       environment_resources => virt_xml("$(this.promiser)"),
       environment_type      => "xen",
       environment_host      => "myphysicalcomputer";
       environment_state     => "create"
}

#######################################################

body environment_resources virt_xml(host)
{
env_spec_file =>

"<domain type='xen'>
  <name>$(host)</name>
  <os>
    <type>linux</type>
    <kernel>/var/lib/xen/install/vmlinuz-ubuntu10.4-x86_64</kernel>
    <initrd>/var/lib/xen/install/initrd-vmlinuz-ubuntu10.4-x86_64</initrd>
    <cmdline> kickstart=http://example.com/myguest.ks </cmdline>
  </os>
  <memory>131072</memory>
  <vcpu>1</vcpu>
  <devices>
    <disk type='file'>
      <source file='/var/lib/xen/images/$(host).img'/>
      <target dev='sda1'/>
    </disk>
    <interface type='bridge'>
      <source bridge='xenbr0'/>
      <mac address='aa:00:00:00:00:11'/>
      <script path='/etc/xen/scripts/vif-bridge'/>
    </interface>
    <graphics type='vnc' port='-1'/>
    <console tty='/dev/pts/5'/>
  </devices>
</domain>
";
}
You should consult the libvirt documentation for the details of the XML specification.
10.5 Virtualization types supported
CFEngine currently supports virtualization only through libvirt, so it supports
those technologies that libvirt supports. Currently this includes most popular
technologies. You must choose the type of monitor that is to be responsible for
keeping the guest environment promise. In CFEngine, you should choose between a
machine environment or network environment of the following types:
xen- A Xen hypervisor virtual domain.
kvm- A KVM hypervisor virtual domain.
esx- A VMware hypervisor virtual domain.
test- The libvirt test-hypervisor virtual domain.
xen_net- A Xen hypervisor virtual network.
kvm_net- A KVM hypervisor virtual network
esx_net- An ESX/VMWare hypervisor virtual network.
test_net- The test hypervisor virtual network.
zone- A Solaris zone (future development)
ec2- An Amazon EC2 instance (future development)
eucalyptus- A Eucalyptus instance (future development)
Once again, you must consult the libvirt documentation for details.
10.6 Distinct states
Libvirt recognizes a number of distinct states are transliterated into CFEngine
as
create- Build and start an guest environment.
delete- Halt and remove runtime resources associated with an guest environment.
running- An existing guest environment is in a running state.
suspended- An existing guest environment is in a `paused' state.
down- An existing guest environment is in a halted state.
The default promised state is for a machine to be running
wherever the environment_host class is true, and
suspended or down elsewhere.
10.7 Example deployment
Prerequisites: you need to make a `disk image' for the machine, or a
virtual disk of blocks that can be allocated. This image does not have to
contain any data, it will simply as a block device for the VM. You
can then install it by booting the machine from a network image, like a
PXE/kickstart installation.
If you want to allocate disk blocks as the file grows, you can create
a file with a hole. The following command will creates a file of
2048MB, but the actual data blocks are allocated in a lazy fashion:
# dd if=/dev/zero of=/srv/xen/my.img oflag=direct bs=1M seek=2047 count=1
To reserve all the data blocks right away:
# dd if=/dev/zero of=/srv/xen/my.img oflag=direct bs=1M count=2048
Libvirt uses an XML file format that cannot be circumvented. CFEngine
promises to honor the promises that are expressed in this file, as in
the examples above. You need to find out about this file format from
the libvirt website. To get CFEngine to Honor these promises, you
point it to the specification that it should promise using
spec_file.
You need to set up a network for virtual machines to communicate with
the outside world. This can also be done with CFEngine, using the
network promise types to build a bridge into a virtual network.
Then just run CFEngine to start, stop or manage the guest environments on
each localhost. Run in verbose mode to see how CFEngine maintains the states
convergently.
# cf-agent -v
11 Content-Driven Policies
In CFEngine 3 Nova 2.0, Content-Driven Policies (CDP) were introduced to make
policy management easier. In contrast to policies written in the
CFEngine language, these are semi-colon separated fields in a text
file that the user just fills with content. All the underlying
enforcement and reporting are taken care of automatically by CFEngine 3 Enterprise.
For example, to manage three Windows services, the following
services-CDP will suffice.
# masterfiles/cdp_inputs/service_list.txt

Dnscache;stop;fix;windows
ALG;start;warn;windows
RemoteRegistry;start;fix;Windows_Server_2008
The meanings of the fields are different depending of the CDP-type,
but explained in the file header. With these three lines, we ensure
the correct status of three services on all our Windows machines and
are given specialized reports on the outcome.
11.1 Benefits of Content-Driven Policies
As seen in the example above, Content-Driven Policies are easy to
write and maintain, especially for users unfamiliar with the CFEngine
language. They are designed to capture the essence of a specific,
popular use of CFEngine, and make it easier. For example, the services
Content-Driven Policy above has the following equivalent in the
CFEngine language.
     bundle agent service_example
     {
     services:

       "Dnscache"
         comment            => "Check services status of Dnscache",
         handle             => "srv_Dnscache_windows",
         service_policy     => "stop",
         service_method     => force_deps,
         action             => policy("fix"),
         ifvarclass         => "windows";

       "ALG"
         comment            => "Check services status of ALG",
         handle             => "srv_ALG_windows",
         service_policy     => "start",
         service_method     => force_deps,
         action             => policy("warn"),
         ifvarclass         => "windows";

       "RemoteRegistry"
         comment            => "Check services status of ALG",
         handle             => "srv_ALG_windows",
         service_policy     => "start",
         service_method     => force_deps,
         action             => policy("fix"),
         ifvarclass         => "Windows_Server_2008";

     }
Writing this policy is clearly more time-consuming and error-prone. On
the other hand, it allows for much more flexibility than Content-Driven
Policies, when that is needed.
CFEngine provides Content-Driven Policies to cover mainstream
management tasks like the following.
- File change/difference management
- Service management
- Database management
- Application / script management
11.2 Getting started
All the CDP input files are located in
/var/cfengine/masterfiles/cdp_inputs on your policy hub. CFEngine 3 Enterprise
is bundled with some examples, but ensure to edit the examples
before enabling them.
To enable all the CDPs located in cdp_inputs/, open
promises.cf in your masterfiles directory. Remove the comment
(#) in front of the cdp entries in bundlesequence and
inputs, to make it look like the following.
bundlesequence => {
                  "def",
                  "cfengine_management",
                  "service_catalogue",
                  "cdp",
...

        inputs => {
...
                  "cdp_lib/cdp.cf",
                  "cdp_lib/cdp_acls.cf",
                  "cdp_lib/cdp_registry.cf",
                  "cdp_lib/cdp_file_changes.cf",
                  "cdp_lib/cdp_file_diffs.cf",
                  "cdp_lib/cdp_services.cf",
                  "cdp_lib/cdp_commands.cf",
...
When the hosts start reporting back on the outcome of these policies
(usually within 10 minutes), you can view the reports in the CDP reports viewer or from your
Knowledge Map on the policy hub.
12 Windows-specific features in CFEngine 3 Enterprise
In this section, we will explore the Windows-specific features of the
native Windows version of CFEngine 3 Enterprise, and how it integrates with
Windows. We will also consider features that are more interesting or
popular on Windows than on other platforms.
Feature highlights include Windows service management and integration,
event logging, Windows registry repair, and fine-tuned file security
support through access control lists. See the sections on databases
and ACLs to find information on Windows registry repair and NTFS ACLs,
respectively. We will look at some of the other added features next.
12.1 Windows service management
CFEngine 3 Enterprise can maintain complete control of the state of all
Windows services, in addition to Unix daemons. Services prone to
security issues or errors can easily be given a disabled state.
A service can also be given a running state, in which case CFEngine
3 Enterprise ensures that it is running, and starts it if it is not, with
parameters if desired. More advanced policy options are also
available, including support for starting and stopping dependencies,
and configuring when the services should be started (e.g. only when
they are being used).
Furthermore, the CFEngine executor in CFEngine 3 Enterprise now runs as a Windows
service itself. This means it runs in the background an starts with
Windows, before any user logs in. It can be configured, started and
stopped from the “Services” listing in Windows.
Note that the name of a service in Windows may be different from its
“Display name”. CFEngine 3 Enterprise policies use the name, not the display
name, due to the need of uniqueness.
12.2 Windows event logging
Event logs are the Windows counterpart to syslog from Unix. The main
difference is that event logs aim to group similar log messages,
giving each group an event id.
A program that creates logs, such as CFEngine 3 Enterprise, must define the
possible event IDs, and their meaning. In many applications, only one
event id is defined, a generic log message. However, CFEngine 3 Enterprise
defines the following range of event IDs, which allows for automatic
handling of log messages.
| Description | Event ID | Type
|
|---|
| Promise kept | 100 | Information
|
| Promise repaired | 101 | Information
|
| Promise not repaired due warn only policy | 102 | Error
|
| Promise not repaired due to error | 103 | Error
|
| Report promise | 104 | Information
|
| Generic information | 105 | Information
|
| Generic verbose | 106 | Information
|
| Generic warning | 107 | Warning
|
| Generic error | 108 | Error
|
The CFEngine 3 Enterprise event logs can be found under the “System” logs. Almost
all monitoring products for Windows supports reading event logs, and
they can thus monitor logs from CFEngine 3 Enterprise as well. This makes it
possible to do more advanced querying on the status of a machine
running CFEngine 3 Enterprise, e.g. to show all promises that have not been
kept in a certain time interval. However, we recommend using the
Knowledge Map to do more advanced things, as it is specifically made
for this purpose and supports all operating systems that CFEngine runs
on.
12.3 Windows special variables
Three new special variables have been added to the Windows version of
CFEngine 3 Enterprise.
sys.windir contains the Windows directory,
e.g. “C:\WINDOWS”.
sys.winsysdir contains the Windows system directory,
e.g. “C:\WINDOWS\system32”.
sys.winprogdir contains the program files directory,
e.g. “C:\Program Files”.
Note that these variables are not statically coded, but retrieved from
the current system. For example, sys.winprogdir is often
different on Windows versions in distinct languages.
12.4 Windows hard classes
The Windows version of CFEngine 3 Enterprise defines hard classes to pinpoint
the exact version of Windows that it is running on, the service pack
version and if it's a server or workstation.
First of all, the class windows is defined on all Windows
platforms. For Windows workstations, such as Windows XP,
WinWorkstation is defined. On Windows servers, such as Windows
Server 2003, WinServer is defined. In addition, if the server
is a domain controller, DomainController is defined. Note that
if DomainController is defined, then WinServer is also
defined, for natural reasons.
The class Service_Pack_X_Y is defined according to the service
pack version. For example, at the time of writing,
Service_Pack_3_0 is set on an updated Windows XP operating
system.
To allow taking specific actions on different Windows versions, one
of the following hard classes is defined.
Windows_7
Windows_Server_2008_R2
Windows_Server_2008
Windows_Vista
Windows_Server_2003_R2
Windows_Home_Server
Windows_Server_2003
Windows_XP_Professional_x64_Edition
Windows_XP
Windows_2000
Note that all defined hard classes for a given system is shown by
running cf-promises -v.
12.5 Notes on windows policies
A potential problem source when writing policies for windows is that
paths to executables often contain spaces. This makes it impossible
for CFEngine to know where the executable ends and the parameters to
it starts. To solve this, we place escaped quotes around the
executable.
Additionally, Windows does not support that processes start themselves
in in the background (i.e. fork off a child process in the Unix
world). The result is that CFEngine is always waiting for the commands
to finish execution before checking the next promise. To avoid this,
use the background attribute in the action body-part.
Both these things are demonstrated in the following example.
body common control
{
bundlesequence  => { "main" };
}

bundle agent main
{
commands:

"\"C:\Program Files\Some Dir\program name.bat\" --silent --batch"
  action => background;
}

body action background
{
background => "true";
}
Finally, one should note that Windows lacks support for certain
features that are utilized in Unix versions of CFEngine. These include
symbolic links, file groups, user and group identifiers.
Thus, the parts of promises containing these features will be
ignored. For example, the getgid() function does not return
anything on Windows. The reference manual documents exactly which
promises are ignored and not. Also, cf-agent from CFEngine
3 Enterprise prints warning messages on ignored attributes when run in verbose
mode.
13 REST API
The Nova REST API allows HTTP clients to access report information gathered by the Nova Hub. Most of the information contained in the reports available through the Mission Portal are also available through REST, although in a slightly different form. Furthermore, the REST API is currently read-only.
13.1 API Overview
The API is composed of a set of HTTP resources available by issuing an HTTP GET request to the resource URI. The available resources at the top-level are:
- Status
/rest/: Version information and database connectivity status.
- Contexts
/rest/context: Occurrences of contexts (classes) at hosts
- Hosts
/rest/host: Host information and last seen records.
- Promises
/rest/promise: Promise compliance, logs and log summaries.
- Setuid Programs
/rest/setuid: Programs running with the setuid flag.
- Software
/rest/software: Installed software.
- Variables
/rest/variable: Policy variables and their most recent values.
- File Changes
/rest/file: Host file changes and their diffs if available.
13.1.1 Response Codes
We have taken some care to return appropriate HTTP error codes and descriptive messages for responses. However, because the API is read-only, the set of codes a client should expect is limited. Some error codes an API should be able to handle are:
- 200 OK. This is the response you should normally expect when querying the API.
- 400 Bad request. Usually indicates that query parameters where not accepted or malformed.
- 401 Unauthorized. Client credentials did not authenticate.
- 403 Forbidden. Client requested a specific resource that was denied by RBAC.
- 404 Not found. A non-existing resource was requested.
- 406 Not Acceptable. Unable to accomodate the
Accept header of the request.
- 500 Internal Error. Usually this means that there was a database connectivity problem. If not, it may indicate a bug.
13.1.2 Response Bodies
The response body always consists of two elements, meta and data. meta always contains the fields total (the total number of results matched by the query), page (the page index returned), count (the number of results on the returned page) and timestamp. data contains the result set. Here is an example.
{
  "meta": {
    "total": 1,
    "timestamp": 1329315702,
    "page": 1,
    "count": 1
  },
  "data": [{
    "apiName": "CFEngine Nova",
    "apiVersion": "v1",
    "hubVersion": "2.2.0.a1.rexported",
    "database": "connected"
  }]
}
Note: For the remainder of this document we show only the contents of the data field for the sake of brevity.
13.1.3 Common Query Parameters
Each resource accept their own set of query parameters, but we have attempted to keep to keep this set uniform within reason across resources. Moreover, a common set of query parameters will be accepted for all resources (and observed where it makes sense).
- count: The number of results to return per page. Default is 50.
- page: The index of the results page to return: Default is 1.
- from: Unix timestamp before which we discard records as too old. Default is 0.
- to: Unix timestamp after which we discard records as too new. Default is current time.
Note: that Software and Setuid resources currently do not support time ranges.
13.1.4 Time
Unless otherwise specified, all timestamps or durations are in seconds. Timestamps are reported in Unix time, i.e. seconds since 1970.
13.1.5 Versioning and Content-Types
Clients may specify the version of the API to use by appending an Accept header to a request with an appropriate content-type. The server responds in turn by appending a Content-Type header to the response, encoding the API version employed. The content-type is a vendor MIME-type of the form application/vnd.cfengine.nova-v<N>+<format>. We only support JSON in this first release of the API, so the content-type header will be application/vnd.cfengine.nova-v1+json. If no Accept header is specified by the client, the server will always return the most recent version available. It is the responsibility of the client to request the desired version and condition on the type of response. In the future, the version will only be bumped in the event of breaking backward-compatibility, not merely adding new resources or options.
13.1.6 Authentication
The REST API uses HTTP basic authentication. Unauthenticated requests will receive a 401 response with a WWW-Authenticate header. Clients are required to append an Authorization: Basic <key> header to each request (since REST is stateless, there is no notion of session state). The key is a Base64 encoded string of the format <username>:<password>. (Note that clients such as web-browsers and curl handle basic authentication seamlessly). This means that the username and password is transmitted effectively as plaintext. Encryption is commonly handled through SSL at the HTTP server.
13.1.6.1 Role-based Access Control for REST
The user table is the same as for the Mission Portal and is stored either in the database or delegated to LDAP. The REST API also works in conjunction with Role-based Access Control (RBAC). Most requests are effectively searches across multiple dimensions, and RBAC may render the result set empty without providing an authorization error. However, when requesting specific resources a client should be prepared for a 403 Forbidden.
13.2 Resources
13.2.1 Status
- URI Path:
/rest/
- Query Parameters: (common only)
The Status resource serves as a simple way to to see if the API is alive and to check which version of Nova it is running. Note that the Nova database (MongoDB) needs to be running in order to authenticate. The Status resource serves as a good starting point to demonstrate simple usage. Here we use curl, a command-line client. The -v flag shows the full HTTP request and response returned.
curl --user admin:admin -v http://localhost:8888/rest

* About to connect() to localhost port 8888 (#0)
*   Trying 127.0.0.1... connected
* Connected to localhost (127.0.0.1) port 8888 (#0)
* Server auth using Basic with user 'admin'
> GET /rest HTTP/1.1
> Authorization: Basic YWRtaW46YWRtaW4=
> User-Agent: curl/7.21.6 (x86_64-pc-linux-gnu) libcurl/7.21.6 OpenSSL/1.0.0e zlib/1.2.3.4 libidn/1.22 librtmp/2.3
> Host: localhost:8888
> Accept: */*
>
< HTTP/1.1 200 OK
< Server: nginx/1.0.5
< Date: Mon, 13 Feb 2012 17:23:39 GMT
< Content-Type: application/vnd.cfengine.nova-v1+json
< Transfer-Encoding: chunked
< Connection: keep-alive
< X-Powered-By: PHP/5.3.6-13ubuntu3.5
< Allow: GET
< X-Resource: Base
<
{"status":"ok","timestamp":1329316866,"page":1,"count":50,"total":1,"result":
 {"apiName":"CFEngine Nova","apiVersion":"v1","hubVersion":"2.2.0.a1.rexported",
  "database":"connected"}}
* Connection #0 to host localhost left intact
* Closing connection #0
Note that the REST API compacts the JSON response rather than pretty-printing it. It is possible to pipe the response from curl into a json prettifier at the command-line. Another option is to use a plugin for a browser like Firefox (e.g. RESTClient).
13.2.2 Contexts
A context (previously class) resource describes the probability of occurrence of a context at a host. Contexts are either defined or not defined during a single run of agent execution.
- URI Path: /rest/context
- Query Parameters:
- hostkey: Host the context occurs at.
- context: A regular expression to filter on contexts active at host.
Example of a typical body from a context response:
[
  {
    "hostkey": "SHA=33736d45041e2a9407be8cf449aeffa95114bef661c20deaca1bbcfbc2922856",
    "context": "entropy_udp_in_low",
    "average": 0.7000,
    "stdv": 0.8367,
    "lastseen": 1328194134
  },
  ...
]
The average and standard deviation refer to the frequency with which the context is observed in agent runs at the host.
13.2.3 Hosts
Hosts are naturally fundamental to CFEngine, being the environment in which cf-agent runs. The REST API allows you to get at some basic information about hosts which agents have corresponded with the Hub. Hosts are universally identified by their hostkey - a SHA1 identifier. To list hosts visibile to the Hub, we can issue the following
13.2.3.1 Listing hosts
- URI Path:
/rest/host
- Query Parameters:
- hostname: Name of host.
- ip: IP-address of host.
- context: Context active at host (Regular Expression).
The base host resource simply returns a list of matching keys.
[
  "SHA=305658693b94e003e765956f1609731419cbc0e5c9caa09e230df5e005f1f283",
  "SHA=33736d45041e2a9407be8cf449aeffa95114bef661c20deaca1bbcfbc2922856"
]
13.2.3.2 Basic Host Information
Now, we can get the name and IP of a particular host, providing the hostkey.
- URI Path:
/rest/host/:id
- Query Parameters: (common only)
{
  "hostkey": "SHA=305658693b94e003e765956f1609731419cbc0e5c9caa09e230df5e005f1f283",
  "name": "hostA",
  "ip": "10.0.0.150"
}
Note that there are tons of other information we could have returned about the host, such as variables. You can get that by issuing requests like /rest/variable?hostkey=SHA.... As we need the capability of searching in variables by other properties than hostkey, we have opted to keep a separate variable resource, rather than a /rest/host/:id/variable.
13.2.3.3 Hosts Seen
Next, we can get information about which hosts a host has seen or has been seen by.
- URI Path:
/rest/host/:id/seen
- Query Parameters: (common only)
[
  {
    "hostkey": "SHA=33736d45041e2a9407be8cf449aeffa95114bef661c20deaca1bbcfbc2922856",
    "lastseen": 108,
    "average": 108,
    "stdv": 180
  },
  ...
]
We can also discover when agents at other hosts discovered a given host. The format of the body of the response is the same - only the URI path is different.
- URI Path:
/rest/host/:id/seen-by
- Query Parameters: (common only)
13.2.4 Promises
Promises are the statements executed by CFEngine agents. We provide three views of promise execution results: Compliance, Log and Log Summary.
13.2.4.1 Promise Compliance
Promise Compliance is the current status of promises in the system and their aggregated statistics.
- URI Path:
/rest/promise/compliance
- Query Parameters:
- hostkey: Host of agent executing the promise.
- handle: Handle of promise.
- context: Context of agent executing the promise (Regular Expression).
- state: Result state of promise, valid values are:
kept, notkept and repaired.
Here is an examplary response:
[
  {
    "handle": "cfengine_correct_cftwin_files_libtwin",
    "hostkey": "SHA=33736d45041e2a9407be8cf449aeffa95114bef661c20deaca1bbcfbc2922856",
    "state": "kept",
    "average": 100.0000,
    "stdv": 0.0000,
    "timestamp": 1328194134
  },
  ...
]
13.2.4.2 Promise Log
A promise ends up in the promise log if the agent managed to repair a previously broken promise, or if a promise was broken. These are held as two separate logs by the Nova database, so we have opted to require the requestor to specify which log to look at, effectively specifying either state repaired or notkept. The results are the same for both states.
- URI Path:
/rest/promise/log/repaired or /rest/promise/log/notkept
- Query Parameters:
- hostkey: Host of agent executing the promise.
- handle: Handle of promise.
- context: Context of agent executing the promise (Regular Expression).
- to: In addition to the common from parameter, discards entries newer than this upper bound.
Example response:
[
  {
    "handle": "garbage_collection_files_tidy_outputs",
    "hostkey": "SHA=305658693b94e003e765956f1609731419cbc0e5c9caa09e230df5e005f1f283",
    "description": " -> Deleted file /var/cfengine/outputs/cf_policy_test_cfengine_com__1326972365_Thu_Jan_19_12_26_05_2012_0x7ff1b940f700",
    "state": "repaired",
    "timestamp": 1327577464
  },
  ...
]
Note that the description field is the collected output from the agent, in this case having repaired a promise.
13.2.4.3 Promise Log Summary
Promise log summaries provides an aggregated view of log messages by grouping similar agent reports and counting them up.
- URI Path:
/rest/promise/log/repaired/summary or /rest/promise/log/notkept/summary
- Query Parameters:
- hostkey: Host of agent executing the promise.
- handle: Handle of promise.
- context: Context of agent executing the promise (Regular Expression).
- to: In addition to the common from parameter, discards entries newer than this upper bound.
Example response:
[
  {
    "handle": "cfengine_correct_cftwin_files_libtwin",
    "description": "Can't stat /var/cfengine/lib in files.copyfrom promise",
    "count": 4,
    "state": "notkept"
  },
  ...
]
From this response, we can deduce that the promise cfengine_correct_cftwin_files_libtwin failed four times across all hosts.
13.2.5 Setuid Programs
Setuid programs is a special report provided by agents about which programs are running with the setuid flag set.
- URI Path:
/rest/setuid
- Query Parameters:
- hostkey: Host where the setuid program is running.
- path: Path of the setuid program (Regular Expression).
- context: Context active at host (Regular Expression).
Example response:
[
  {
    "path": "/usr/sbin/pppd",
    "hostkeys": [
      "SHA=305658693b94e003e765956f1609731419cbc0e5c9caa09e230df5e005f1f283"
    ]
  },
  ...
]
13.2.6 Software
The agent reports on which software is currently installed on the host.
- URI Path:
/rest/software
- Query Parameters:
- hostkey: Host where the software is installed.
- name: Name of the software.
- version: Version of the software.
- arch: Architecture of the software.
- context: Context active at host (Regular Expression).
Example response:
[
  {
    "name": "sed",
    "version": "4.1.5-5.fc6",
    "arch": "x86_64",
    "hostkeys": [
      "SHA=33736d45041e2a9407be8cf449aeffa95114bef661c20deaca1bbcfbc2922856"
    ]
  },
  ...
]
13.2.7 Variables
Variables are similar to contexts in that they are either built-in (hard) or promises (soft). In contrast to contexts, variables may assume a range of value types, whereas contexts are either defined or not defined. The scope of the variable is the name of the bundle (container of promises) where it was defined. In the case of variables redefined during execution, the final value is reported.
- URI Path:
/rest/variable
- Query Parameters:
- hostkey: Host where the variable promise was executed.
- scope: Name of the variable.
- name: Name of the variable.
- value: Value of the variable.
- type: Type of the variable (see Variable Types).
- context: Context active at host (Regular Expression).
13.2.7.1 Variable Types
Variables are either lists of scalars, or scalars. The following are scalar types.
- string
- int
- real
- menu (an enumerated value)
Correspondingly, the list types are slist, ilist, rlist and mlist.
Here is an example response to a variable request.
[
  {
    "hostkey": "SHA=33736d45041e2a9407be8cf449aeffa95114bef661c20deaca1bbcfbc2922856",
    "scope": "control_runagent",
    "name": "hosts",
    "type": "slist",
    "value": [
      "127.0.0.1"
    ]
  },
  {
    "hostkey": "SHA=33736d45041e2a9407be8cf449aeffa95114bef661c20deaca1bbcfbc2922856",
    "scope": "control_reporter",
    "name": "style_sheet",
    "type": "string",
    "value": "/cf_enterprise.css"
  },
  ...
]
13.2.8 File Changes
The agent is able to monitor files for changes, and optionally produce a diff for the changes.
- URI Path:
/rest/file
- Query Parameters:
- hostkey: Host where the software is installed.
- path: Path of file changed (Regular Expression)
- context: Context active at host (Regular Expression).
Here is an example of a two file files, one for which a diff was also captured.
[
    {
        "hostkey": "SHA=305658693b94e003e765956f1609731419cbc0e5c9caa09e230df5e005f1f283",
        "path": "/etc/passwd",
        "timestamp": 1234567
    },
    {
        "hostkey": "SHA=305658693b94e003e765956f1609731419cbc0e5c9caa09e230df5e005f1f283",
        "path": "/etc/group",
        "timestamp": 1234567,
        "diff": {
            "type": "add",
            "line": 5,
            "value": "sambashare:x:124:a10021"
        }
    },
    ...
]
14 Troubleshooting
14.1 Mission Portal Logs
The Mission Portal will log php errors, errors related to the configuration of external authentication (LDAP/Active Directory) and occurrences of the fall-back solution if external authentication fails. The log can be found in DOCROOT/application/logs (i.e. /var/www/application/logs for Ubuntu and /var/www/html/application/logs for Red Hat). The logs folder must be writable by apache, i.e. by 'www-data' user.
14.2 Apache HTTP error_log is your friend
The first place to diagnose (if all CFEngine processes and mongod are up and running) is:
RHEL 5,6 / CentOS 5
/var/log/httpd/error_log
SLES 11 / OpenSuSE 11 / Debian 5,6 / Ubuntu 8,10
/var/log/apache2/error_log
This log file will often provide useful information on which components are not operating properly.
14.3 Some report pages return HTTP error 404
Confirm that Apache REWRITE module is ON. Restarting httpd/apache2 service is required if rewrite was disabled.
14.4 CFEngine processes are running but I cannot connect to the Mission Portal web page
There can be several reasons for this, please check the following:
- Check that apache is running (the process should appear in the list when you run this command):
$ ps waux | grep apache
- Ensure that port 80 is open on the hub and not blocked by a firewall (the following telenet connection should succeed):
$ telnet <IP-ADDRESS> 80
- Check that there are no problems with php-mod by looking for error messages in the httpd error log or apache_error log.
14.5 First time login to Mission Portal fails
MongoDB needs to be initialized for authentication of the default user. Run the following command (line has been split and indented for presentability):
   $ /var/cfengine/bin/mongo phpcfengine
	/var/cfengine/share/GUI/phpcfenginenova/export.js
Default user name and password on the Mission Portal login page are 'admin' and 'admin'.
14.6 Cannot send emails from the Mission Portal
The default email address used by the system is "admin@cfengine.com". To change this, edit application/config/ion_auth.php at the line containing:
$config['admin_email'] = "admin@cfengine.com";
14.7 Warning messages on web pages in SLES/OpenSuSE Hub
Warnings appear because the default environment is set to "Development" and in this context the Mission Portal will show all php errors to the user. Set the environment to "Production" to silence these warnings, they will still be logged in Apache Error_log. To edit the default environment, visit "index.php" in your default web root directory and change the following line to suit your needs:
define('ENVIRONMENT', 'Development');
14.8 Knowledge map remains unpopulated
Try building the Knowledge map manually:
RHEL 5 / CentOS 5
   $ /var/cfengine/bin/cf-promises -r && /var/cfengine/bin/cf-know -f
       /var/www/html/docs/enterprise_build.cf -b
SLES 11 / OpenSuSE 11
   $ /var/cfengine/bin/cf-promises -r && /var/cfengine/bin/cf-know -f
       /srv/www/htdocs/docs/enterprise_build.cf -b
Debian 5,6 / Ubuntu 8,10
   $ /var/cfengine/bin/cf-promises -r && /var/cfengine/bin/cf-know -f
       /srv/www/htdocs/docs/enterprise_build.cf -b
14.9 I get a promise failed with the message Can't stat /var/cfengine/master_software_updates/SOME-OS on some hosts
There is a built-in promise to automatically upgrade the CFEngine 3 Enterprise
binaries. By default, the clients will check for an update package
every time CFEngine 3 Enterprise runs. So if the clients find that there is no source
directory to download the files from, the message will be displayed.
To fix the problem, simply create an empty directory mentioned in the
message on the hub.
hub # mkdir /var/cfengine/master_software_updates/SOME-OS
14.10 I get messages of connection failures to a database on my hub
For example, in messages, I can see something like !! Could not open connection to report database for saving. What should I do?
This message comes from the cf-hub process. It is responsible
for pulling reports from hosts that have contacted the hub to get
policy updates. When these reports are fetched, they are stored in a local MongoDB database on the hub. This message is produced when there is a failure in the connection to the database.
Probably, the issue is that the database server is not running on your
hub. Run the ps-command to check this.
hub # ps -e | grep mongod
If the mongod process is running, it must be
misconfigured or in some bad state. Please look at the newest entry in
/var/log/mongod.log to diagnose the problem, and contact
CFEngine Technical Support if necessary.
If the mongod process is not running, please follow the
steps below.
- Run
hub #
/var/cfengine/bin/cf-twin -Kvf failsafe.cf > /tmp/cfout
- Check again if the
mongod is running, if so, the problem
is probably fixed now.
- If
mongod is still not running, please search the output
file for lines starting as follows.
     ...
     nova>  -> Making a one-time restart promise for mongod
     ...
     ...
     nova>  -> Executing '/var/cfengine/bin/mongod....
     nova>  -> Backgrounding job /var/cfengine/bin/mongod...
     nova>  -> Completed execution of /var/cfengine/bin/mongod...
     ...
If you don't see the first line above, CFEngine 3 Enterprise does not try to start
mongod — so check if you bootstrapped your hub correctly. If
you see all lines, it means that CFEngine 3 Enterprise starts mongod, but the process just
terminates immediately after. If so, continue to the next step.
- Look at the newest entry in /var/log/mongod.log. It
should give you more details of why the
mongod process refuses
to start. The two most common scenarios are described next.
- If
mongod has been terminated unexpectedly, it might have
left a lock-file behind that stops it from starting again. Try
deleting /var/cfengine/state/mongod.lock if it exists.
- If the database is corrupted, you can have mongod create a new one by moving
/var/cfengine/state/cf-report.* out of the way. There are also
tools and documentation for repairing a database at
http://www.mongodb.org/.
Note that almost all of the cfreport database is recreated with data collected from clients. This happens every 5 minutes or 6 hours (depending on the probe), you may consider whether deleting the database is an acceptable solution. CFEngine AS or CFEngine Inc can not be held responsible for data loss in this respect.
Appendix A Configuration of external authentication
External authentication is available for CFEngine 3 Nova 2.1 and later versions, but by default the Mission Portal will use the embedded database to store user information (default user name and password on the Mission Portal login page are "admin" and "admin"). Note that users in the default database will be locked out of the Mission Portal upon configuration of external authentication. They will regain access if external authentication is deactivated by selecting the Database button on the Mission Portal Settings page (see below).
To enable external authentication on a fresh install, log on to the Mission Portal with the default user and password and go to "User Settings and Preferences" (see User Settings and Preferences). Click "Mission Portal Settings" and enter the appropriate configuration for LDAP or Active Directory as described below. Note that the actual setup of LDAP or Active Directory (definition of users, directory hierarchy, etc.) has to be done independently and is not covered in this document.
A.1 Configure LDAP
Select the LDAP button and enter the appropriate configuration settings for your system.
Figure: Configure LDAP
Form fields:
- LDAP host: Address of the LDAP machine
- Base dn: LDAP root, the top entry (starting point) in the directory
- Login attribute: Field name used to match user name, e.g. uid.
- User directory: Directory name where user names are stored, e.g. cn=users or ou=people
- Encryption: Chose the encryption protocol to be used for authentication
- External admin user name: Enter the LDAP user name of the person that is supposed to have admin rights
- Fall-back role: User group that will be able to access the Mission Portal through internal database authentication if external authentication is down or misconfigured.
Always check that the entered configuration is correct by clicking the "Test it" button before submitting changes. Enter a valid user name and password in the popup to test LDAP bind. Submitting an incorrect configuration will put LDAP down and lock out all users, CFEngine 3 Enterprise therefore comes with a fallback solution. Select a fallback administrator group in the database from the dropbox, CFEngine 3 Enterprise will look for users in this group when an incorrect configuration has been passed. A member of this group will then be able to log on to the Mission Portal using his internal database user name and password and restart the external authentication configuration.
If you wish to use RBAC in combination with LDAP, we recommend that you wait to turn on RBAC until you log on with the LDAP user that has been designated a Mission Portal admin (i.e do not turn RBAC on while logged on with an internal database user in this case).
A.2 Configure Active Directory
Select the Active Directory button and enter the appropriate configuration settings for you system.
Figure: Configure Active Directory
Form fields:
- LDAP host: Address of the LDAP machine
- Base dn: LDAP root, the top entry (starting point) in the directory
- Login attribute: Field name used to match user name, e.g. uid.
- User directory: Directory name where user names are stored, e.g. cn=users or ou=people
- Active directory domain: Field name used to match directory domain on Windows machines, e.g. windows1.test.cfengine.com
- Encryption: Chose the encryption protocol to be used for authentication
- External admin user name: Enter the AD user name of the person that is supposed to have admin rights
- Fall-back role: User group that will be able to access the Mission Portal through internal database authentication if external authentication is down or misconfigured.
Always check that the entered configuration is correct by clicking the "Test it" button before submitting changes. Enter a valid user name and password in the popup to test LDAP bind. Submitting an incorrect configuration will put LDAP down and lock out all users, CFEngine 3 Enterprise therefore comes with a fallback solution. Select a fallback administrator group in the database from the dropbox, CFEngine 3 Enterprise will look for users in this group when an incorrect configuration has been passed. A member of this group will then be able to log on to the Mission Portal using his internal database user name and password and restart the external authentication configuration.
If you wish to use RBAC in combination with LDAP, we recommend that you wait to turn on RBAC until you log on with the LDAP user that has been designated a Mission Portal admin (i.e do not turn RBAC on while logged on with an internal database user in this case).