CFEngine is a systems management tool designed to help you configure and automate your IT infrastructure. It can expertly handle any number of tasks, ranging from the standardization of server builds to the deployment and management of software and services. In terms of real time administration, CFEngine has the ability to maintain system security from both a file system and process perspective and report on environmental health and status.
CFEngine is a distributed solution that is completely independent of host operating systems, network topology or system processes. You describe the ideal state of a given system by creating promises and the CFEngine agent ensures that the necessary steps are taken to achieve this state. Automation in CFEngine is executed through a series of components that run locally on client, server or hub (Nova Only) systems.
The power behind CFEngine lies in its components and the scripting language used to interact with them. Once you know the scripting language, you can clearly and specifically express your desired end state, allowing CFEngine to achieve your goals with precision.
There are a number of components in CFEngine, with each component performing a unique function. The following components form the basis of automation:
cf-execdcf-agentcf-serverdIn conjunction with the process/agents listed, CFEngine needs to know what you would like to automate, maintain or configure. For this purpose, CFEngine has two additional components: promises and policies. A promise is a statement, written in plain text using the CFEngine language, that describes the desired state of a system. A policy is a collection of one or more related promises, which is executed every time the cf-agent runs.
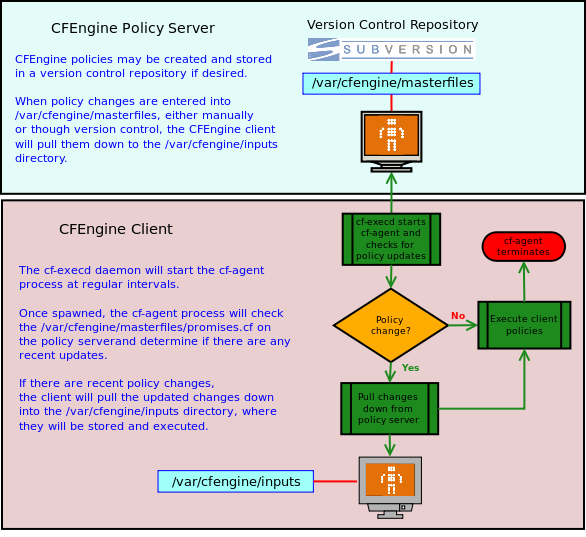
Next are the actual working files which are processed by CFEngine whenever the cf-agent process runs. Perhaps the most important file is the default policy file, which is called promises.cf. It is stored locally on every host, enabling execution with or without network dependencies. If you would like to update a policy, you simply make a change to the desired policy file on the policy server or hub (Nova Only), then update promises.cf accordingly. Each client Agent will automatically pull the new version in, then execute the new instructions on the next run.
Once CFEngine is installed on a system, it can function as either a standalone client or as a part of a multi-node infrastructure. Clients are designed to pull policies from either a CFEngine policy server or hub (Nova Only), or, from themselves in the absence of a policy server. If a system is dedicated as a CFEngine policy server or hub, it is still a client that will maintain it's own state regardless of it's function to the rest of CFEngine infrastructure. In addition, a client can assume various roles in any given infrastructure; be it a version control repository, distribution server or end host.
Checkpoint:
For the purpose of these exercises, it would be ideal to have 2 test systems available for CFEngine installation and configuration. You will name the first test system cfhub and the second system, which you will use in Step 3, will be named cfhost. Although installation and testing on a single host will sufficiently demonstrate the power of promises and policies, using 2 or more systems will allow you to experience what CFEngine brings to the table in terms of multi-system management.
The CFEngine package comes in many different flavors. For Linux systems, CFEngine is available as a pre-compiled binary for many distributions, including: Debian, Fedora, RHEL, SuSE and Ubuntu. These packages are available from http://cfengine.com/inside/myspace. To unpack the binaries (you must install them as root):
               rpm -ihv cfengine-nova-2.1.x.y.rpm
               rpm -ihv cfengine-nova-expansion.2.1.x.y.rpm
               dpkg --install  cfengine-nova-2.1.x.y.deb
               dpkg --install  cfengine-nova-expansion.2.1.x.y.deb
rpm -ihv cfengine-nova-2.1.x.y.rpm
dpkg --install cfengine-nova-2.1.x.y.deb
On the hub, a public key has now been created in
/var/cfengine/ppkeys/localhost.pub
as part of the package installation. You should send this public key to CFEngine Support as an attachment in the ticket system, to obtain a license file license.dat. Save the returned license file to /var/cfengine/masterfiles/license.dat on the hub before continuing.
For more details on software licensing see:
If they are not installed, then you can easily install them using the appropriate package manager:
apt-get install libdb4.* libpcre3 libssl
yum install db4 pcre openssl
zypper install libdb-4_* pcre libopenssl
Once the prerequisites are installed or verified, you may proceed to the CFEngine installation.
rpm -ihv cfengine-community-3.x.y.rpm
dpkg --install cfengine-community-3.x.y.deb
For other UNIX/Linux systems, you may download and compile the source code, which is available from http://cfengine.com/source_code.
The CFEngine application is fully contained within the /var/cfengine directory tree. Although you will get to know this file system intimately as you progress, here is a quick breakdown of the directory structure and some of the files and functions associated with each subdirectory:
If you have ever taken a course in programming, then you are probably familiar with the Hello World program. For CFEngine3, the Hello World policy would look like this:
body common control
{
bundlesequence => { "test" };
}

bundle agent test
{
reports:
  cfengine_3::
      "Hello world!";
}
This policy can be manually run by performing the following steps:
root@cfhub # cf-promises -f /var/cfengine/inputs/test.cf
          root@cfhub #   cf-agent -f /var/cfengine/inputs/test.cf
          R: Hello world!
Like many languages, CFEngine has a structure which allows declarations, variables and classes. The body structure is a place to list constraints and items that control the flow of a policy. It can be seen as a template macro (similar to the main() function in c) that organizes promise attributes. The bundle structure can be viewed as a collection of promises under a single name, much like a subroutine in other languages.
Looking at the `Hello World' promise syntax, you will notice that it starts with the following body structure:
body common control
{
bundlesequence => { "test" };
}
In this example, the body common control is used to control promise behavior by calling the bundle agent test, which is a collection of promise attributes:
bundle agent test
{
reports:
  cfengine_3::
   "Hello world!";
}
This bundle structure contains a special type of promise known as
reports: , which will automatically output `Hello World' if all
conditions of the promise are kept. Finally, there is the cfengine_3::
class. This class is defined by CFEngine out of the box. When it's
used in a promise, it checks to see that the CFEngine client is
running version 3.
So, to summarize; the promise that you just wrote and executed checked that the version of CFEngine you are running is at version 3; and if it is at version 3, it sent the Hello World string to the command line.
Now that you have a better understanding of how the syntax works, we will go over the method we used to execute the policy. The policy that you wrote, test.cf was manually executed by the cf-agent binary. Prior to running the cf-agent command, you checked the promise syntax by running the cf-promises binary:
root@cfhub # cf-promises -f /var/cfengine/inputs/test.cf
Normally, cf-promises is automatically executed by cf-agent as part of its run time operations, where, by default, it verifies the configuration syntax in the promises.cf file. By adding the -f flag and specifying a file name and path, you directed cf-promises to check and verify the specified file only: test.cf. In addition, we chose to run the policy manually, which is why we invoked cf-agent from the command line:
root@cfhub # cf-agent -f /var/cfengine/inputs/test.cf
As a rule, CFEngine is fully automated and the cf-agent binary is started by the cf-execd daemon at a user specified interval (defaults to 5 minutes). Again, in this instance, the agent was manually started using the -f flag to execute the specified file.
If you would like to experiment with promise construction and manual execution, the following link will take you to a web based site designed for that purpose: Quickstart Promise Editor http://cfengine.com/policy_wizard/
In Step 2, we demonstrated how CFEngine operates as a standalone system. While there may be a few instances where running CFEngine on a standalone system is ideal; the real power of CFEngine lies in its ability to perform multiple tasks in a multi-tiered network environment. To demonstrate the working relationship between a CFEngine policy server and client, we will set up a client named cfhost and configure it to pull and execute policies from the cfhub system, which will be set up as the policy server. Before we start, it might be helpful to get a `look' at how CFEngine maintains a configured state in a networked environment. Note that the revision control system is optional. You only need to place your policy file into the /var/cfengine/masterfiles directory, then update the promises.cf file accordingly.
The objective of this exercise is to check that a file named cf_test_file exists on both the CFEngine policy server and client. If it does not exists, we are instructing CFEngine to create it. Additionally, we are directing CFEngine to ensure that the permissions are set to 644; that it is owned by root; and the group ownership is the ‘sys’ group.
root@cfhub# /var/cfengine/bin/cf-agent --bootstrap --policy-server 172.16.100.134
-> Bootstrap to 172.16.100.134 completed successfully
root@cfhost# /var/cfengine/bin/cf-agent --bootstrap --policy-server 172.16.100.134
     bundle agent test
     {
     files:
       "/tmp/cf_test_file"
           comment => "Promise that a plain file exists with stated permissions",
             perms => mog("644", "root", "sys"),
            create => "true";
     }
     body common control
     {
     bundlesequence => { "main" };
     inputs => {
               "cfengine_stdlib.cf",
               };
     version => "Community Promises.cf 1.0.0";
     }
Modify this section by adding the new bundle name and input file (in red):
     body common control
     {
     bundlesequence => { "main","test" };
             inputs => {
                       "cfengine_stdlib.cf",
                       "cftest1.cf",
                       };
            version => "Community Promises.cf 1.0.0";
     }
Additionally, take a look at the /var/cfengine/inputs on cfhost; you will now see the cftest1.cf file, which was moved from cfhub. You will also notice that the original promises.cf file has been saved and the promises.cf file from cfhub is now in its place.
The exercise above was a simple example utilizing a very straightforward client/ server setup. CFEngine can scale to fit any existing environment as illustrated in the image below:
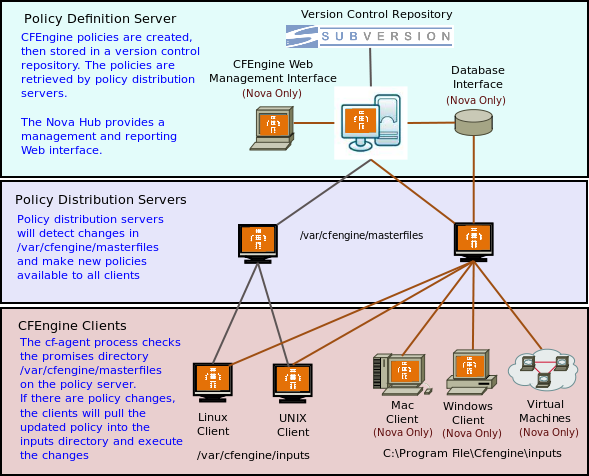
In this example, there are multiple policy distribution servers. Each policy server acts as a discrete distribution point for policies that are unique to a specific subset of hosts. Additionally, a CFEngine Nova Hub acts as a policy distribution point for a number of clients, including Windows, Mac and Virtual Machines. The Nova Hub also allows provides a management and reporting Web interface for all of the systems that it manages.
We hope that this document has been a helpful first step in your quest to unleash the power of CFEngine in your environment! For more information, please visit the CFEngine Web Site, where you will find a wealth of documentation; including tips, tricks, tutorial's, manual's, references, How-To's and cookbooks.
We recommend the following reading:
For a complete overview:
Links to external resources: