
This blog is the result of joint technology collaboration between Arista Networks and CFEngine Inc.
Introduction
It is an accepted fact that the disciplines of system administration and network administration are traditionally very disjoint: different teams, different knowledge, different tools and different goals. For example, does the networking team know which nodes and applications are affected by a change on a specific switch? Is the network topology actually the way it says it is in the design diagrams? Unfortunately, network design diagrams and server CMDBs quickly grow out of sync with reality in today’s fast-changing world. This makes questions like the above virtually impossible to answer, thus leaving luck to play an important role in what changes lead to downtime, loss of revenue and late-hour emergency fixes. However, times are changing and one of the promises of the DevOps movement is enabling better collaboration across these teams. The first step towards collaboration is to enable holistic visibility of the current configuration of the environment, which includes applications, servers and the network connecting them. A popular use case for CFEngine today is to update server CMDBs with the current information. CFEngine can do this as it is running on all the nodes and provides a server-side API for the inventory - as it was seen 5 minutes ago. The missing piece is to also extend this and enable this in the network layer. In this blog series, a joint-effort between Arista and CFEngine focused on network automation, we will look at how to discover and report complete inventory information with CFEngine running on Arista switches (this part), as well as how to easily extend the information using the new Arista APIs (part two).
Setting up Arista vEOS
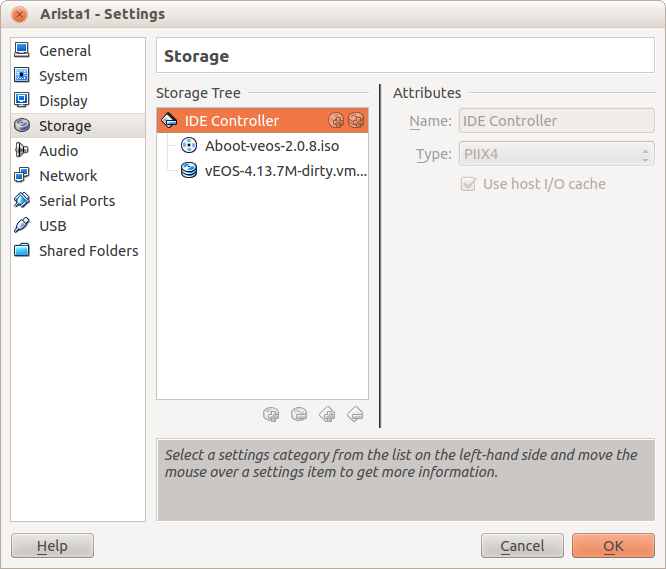
Arista provides a virtual appliance of their software stack, so that it
can be run on most hypervisors. This is what we will use for this
tutorial. We can get the vEOS and aboot from https://eos.arista.com,
specifically https://www.arista.com/en/support/software-download. In
this example, we used vEOS-4.13.7M.vmdk and Aboot-veos-2.0.8.iso with
VirtualBox 4.1.12. To configure the Arista VM, set Fedora 32 bit as VM
type, memory to 2GB, host only network, the disk to the vmdk file and
boot from the aboot iso as a CD/DVD drive. It is important that the iso
and vmdk file are on the same IDE controller, as shown in the
screenshot below.
 Now you can boot the VM, and you should be taken to a login screen.
Setting up CFEngine
The Policy Server
We create a new VM with CentOS 6 that will serve as the CFEngine
Enterprise Policy Server. For the network, we will use the same host
only adapter as we did when creating the vEOS VM, and after creation set
the IP address with ifconfig eth0 192.168.33.100 (check the subnet on
your hosts’ vboxnet0 interface). We are now able to scp in and install
the CFEngine Enterprise Red Hat 6 hub package found at the CFEngine
download page and bootstrap
the hub to itself with /var/cfengine/bin/cf-agent -B 192.168.33.100.
Make sure that the Policy Server does not have a firewall on port 5308,
e.g. by disabling it with iptables -I INPUT -j ACCEPT.
Arista vEOS switches as clients
For the client, we log in to the Arista vEOS VM with the admin user,
using a blank password. By typing enable, bash and sudo -s, we
get into a bash shell as root, and set the IP address with ifconfig ma1 192.168.33.101. To install CFEngine Enterprise, we can use the
“32-bit RPM-based distribution” Host package found on the CFEngine
download page above. Finally, we bootstrap the Arista switch to the hub
with /var/cfengine/bin/cf-agent -B 192.168.33.100. You might also need
to configure the firewall to allow incoming connections from the policy
server on port 5308, like for the Policy Server. You can use the same
procedure to bootstrap more vEOS switches to CFEngine. CFEngine
Enterprise will now start to collect reports from the Arista switch. You
should see it in the Mission Portal web interface within 15 minutes (log
in to http://192.168.33.100, admin/admin).
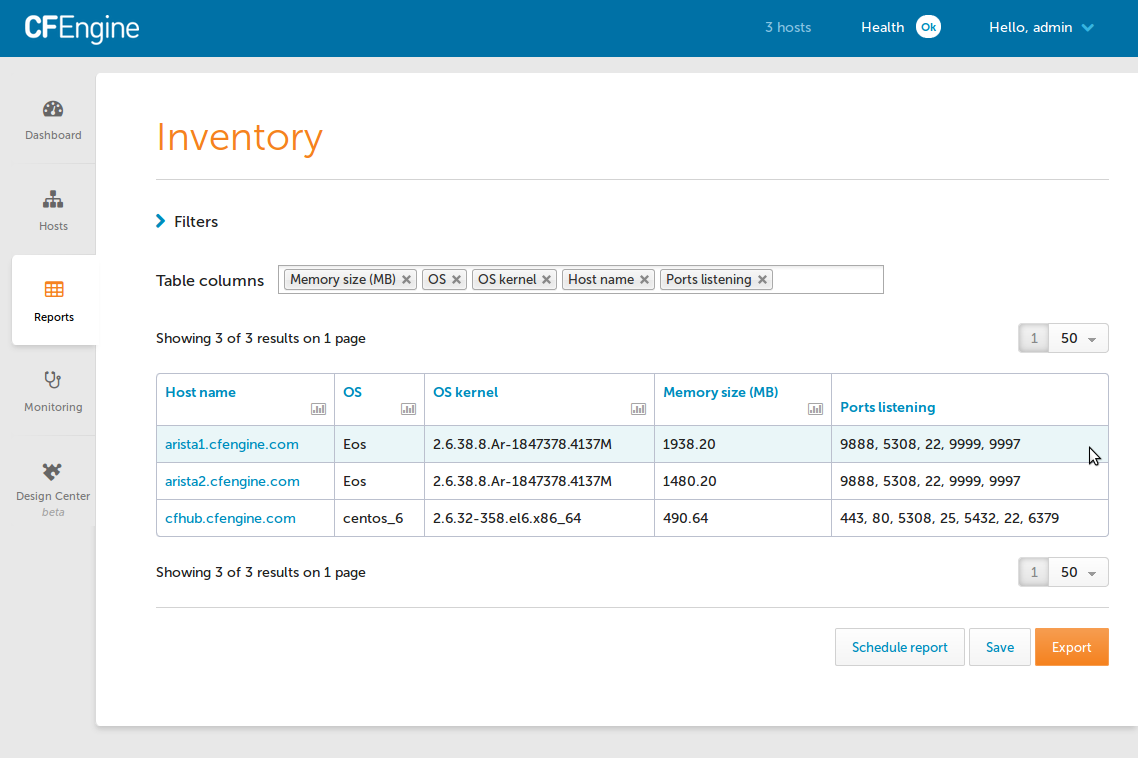
Inventory reports out of the box
By simply adding the Arista switches to CFEngine’s management, we get
inventory reports out of the box. Simply log in to the Mission Portal,
go to Reports -> Inventory, and you will be presented with the out of
the box inventory attributes collected by CFEngine. The example below
shows some general attributes, as well as the ports that are listening.
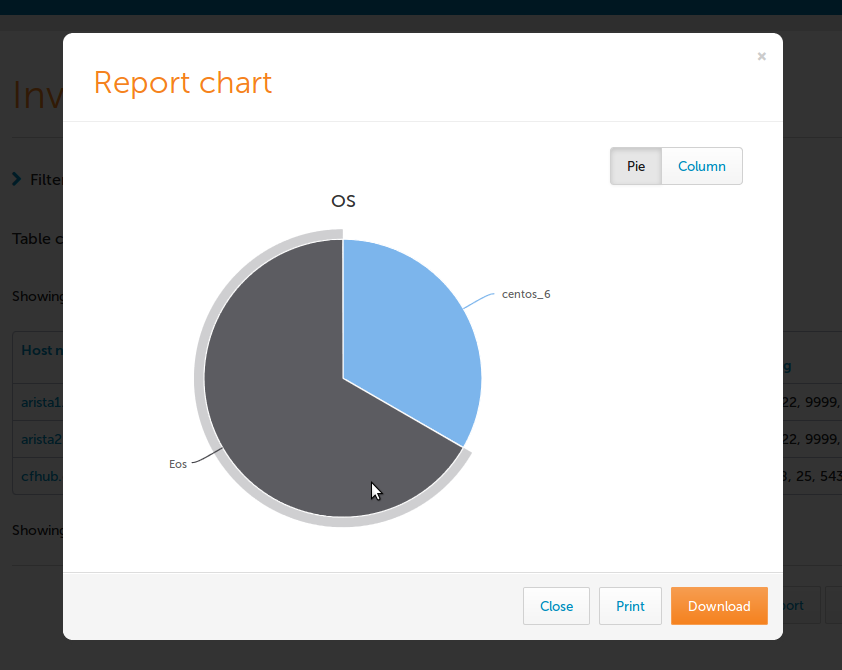
 We can also easily create charts of the inventory, e.g. the OS, as shown
below.
We can also easily create charts of the inventory, e.g. the OS, as shown
below.
Summary
This tutorial showed how we can easily add Arista switches under CFEngine management to gain visibility of them and their inventory. We also looked at how to effectively create inventory reports using the CFEngine Enterprise 3.6 inventory reporting interface. In the next part to this series, we will look at how to extend this information - in particular how to detect network topology relevant for making changes to the infrastructure. Please drop us a note if you have any questions or comments about Arista and network management with CFEngine Enterprise! Note: CFEngine is taking big strides in engaging with our network ecosystem of partners. In a recent blog post we detailed how to make IP (Layer3) a first-class netizen in the configuration world. You can read that piece here


